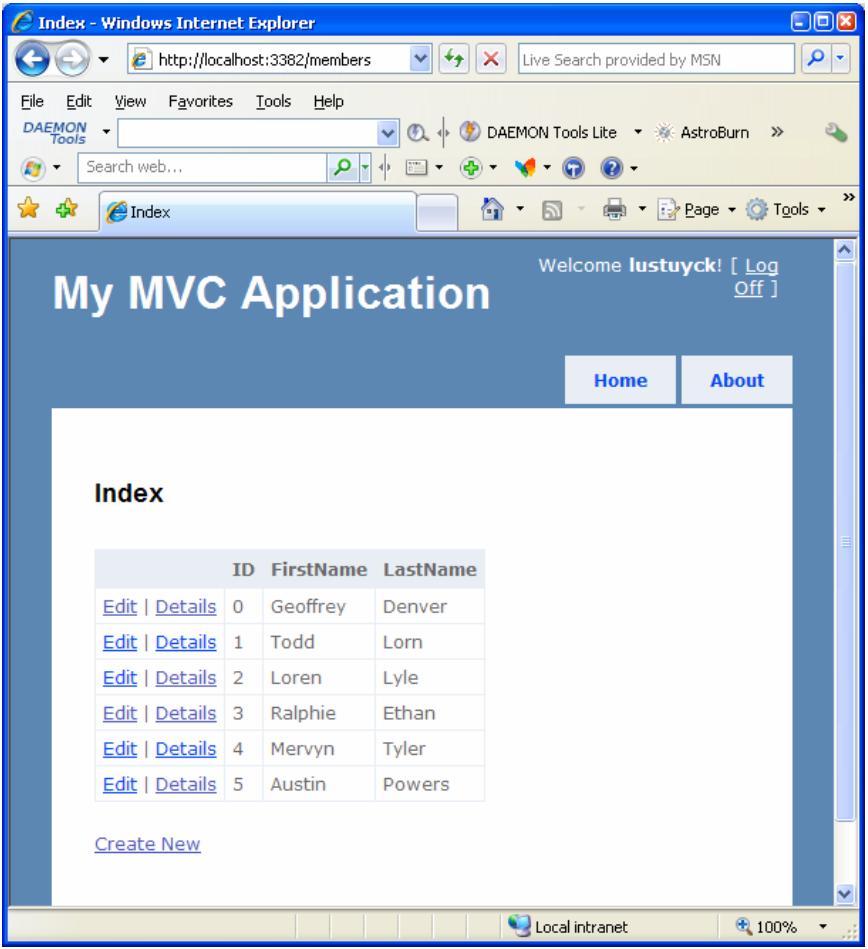
Task 1: making the Details link work
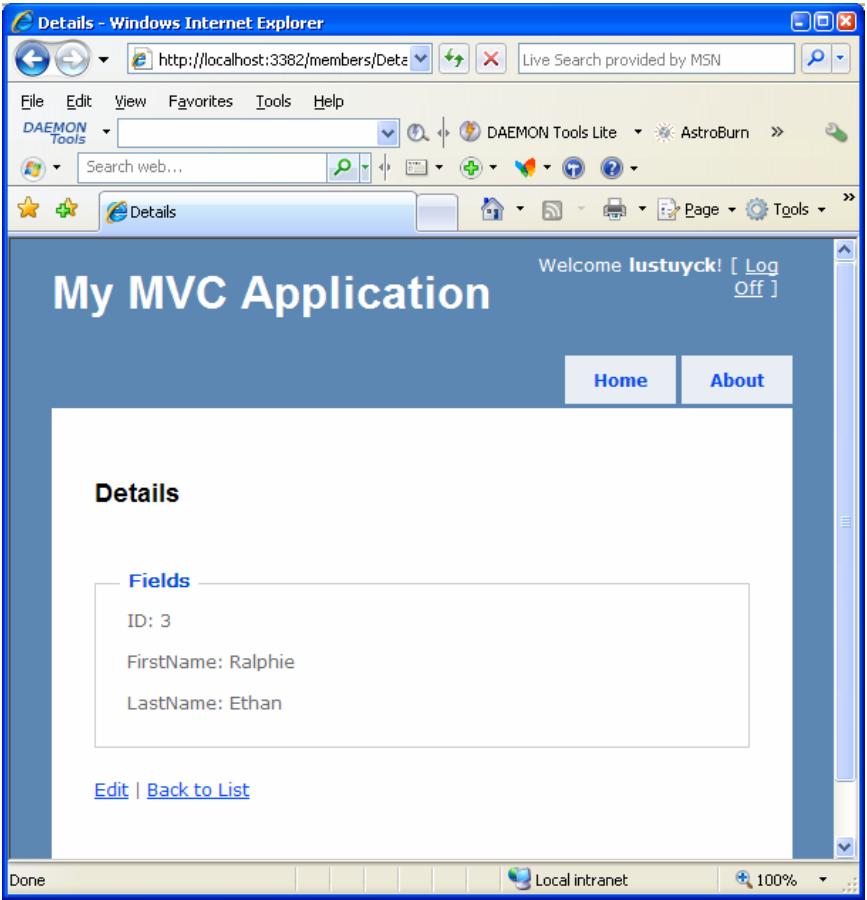
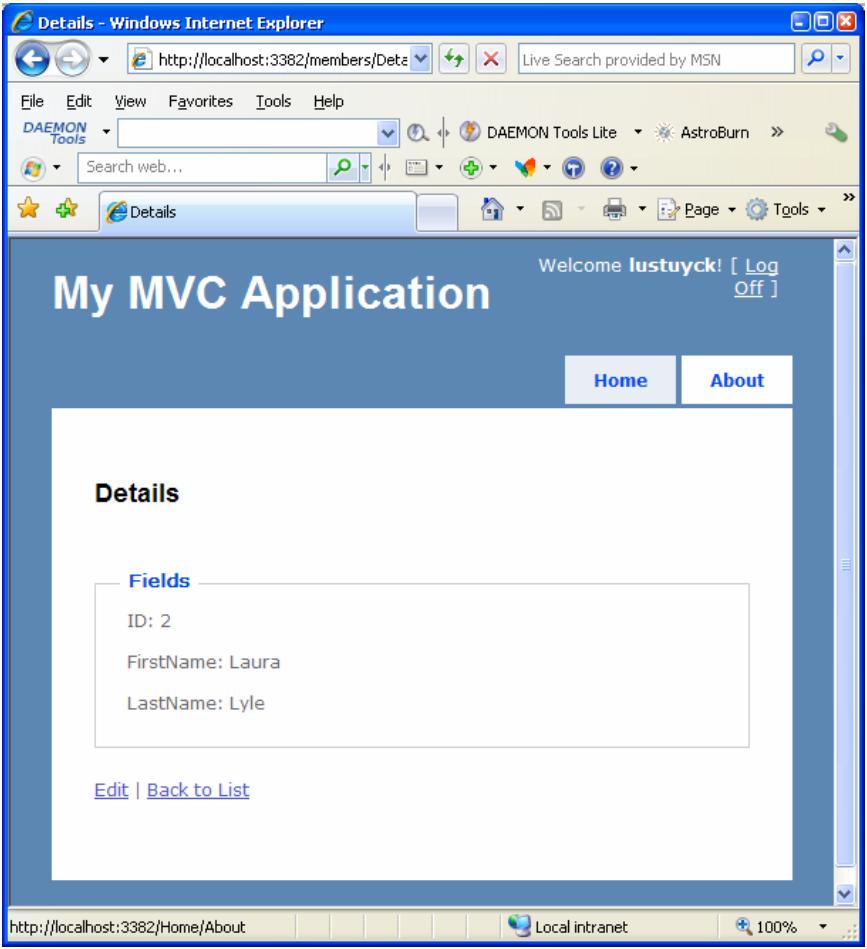
When you click on the Details link, you would expect to see a page with the details of that specific member.First, start the web application again and hover the Details links to see the URL each link refers to (generated by the Html.ActionLink methods):
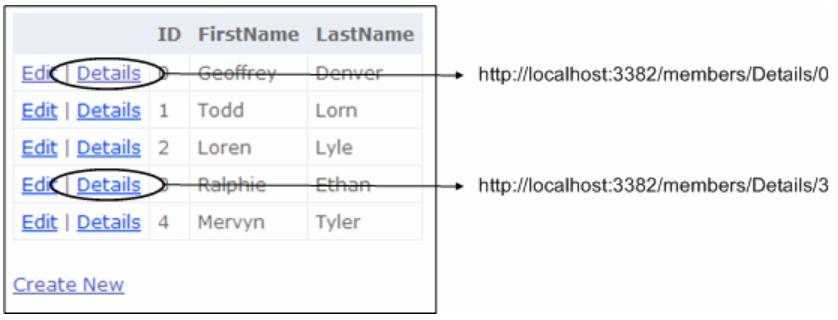
Details link
The first thing we need to do is to update our Model code so that we can retrieve the details of a member, because that’s the responsibility of the model. So open the MemberService class in the Model folder, and add the following method:
public static Member GetMember(int id)
{
    return members.Find(m => m.ID == id);
}
This simply uses a lambda expression to find the member with specified id in the members collection.Now we will create the controller action: open the MembersController class in the Controllers folder and add the following method:
public ActionResult Details(int id)
{
    // Get member details for the specified member id
    Member member = MemberService.GetMember(id);
    // return this member to the default view
    return View(member);
}
Finally we have to create the view that will show the member details. Right click the Details method and select Add View, and make sure everything is filled in as follows:

Add view
- The View name is called Details.
- You check the Create a strongly typed view check box, and set the View data class to MvcApplication1.Models.Member. This way, we will be able to access the member data in the view in a strongly typed way.
- Select Details as the View content. This will generate code that displays the details of a member.
<%@ Page Title="" Language="C#"
         MasterPageFile="~/Views/Shared/Site.Master"
         Inherits="System.Web.Mvc.ViewPage<
                      MvcApplication1.Models.Member>" %>
<asp:Content ID="Content1" ContentPlaceHolderID="TitleContent"
             runat="server">
 Details
</asp:Content>
<asp:Content ID="Content2" ContentPlaceHolderID="MainContent"
             runat="server">
    <h2>Details</h2>
    <fieldset>
        <legend>Fields</legend>
        <p>
            ID:
            <%= Html.Encode(Model.ID) %>
        </p>
        <p>
            FirstName:
            <%= Html.Encode(Model.FirstName) %>
        </p>
        <p>
            LastName:
            <%= Html.Encode(Model.LastName) %>
        </p>
    </fieldset>
    <p>
        <%=Html.ActionLink("Edit", "Edit", new
                      { /* id=Model.PrimaryKey */ }) %> |
        <%=Html.ActionLink("Back to List", "Index") %>
    </p>
</asp:Content>
And again, replace the documented code in the action links so that we assign the primary key to each member instance for the Edit link:
<%= Html.ActionLink("Edit", "Edit", new { id=Model.ID }) %> |
Put a breakpoint at the first line in the Details action method in
the MembersController and hit F5 to debug the application. Change the
url to http://localhost:3382/members/index
and click on the Details link of a specific member. When the breakpoint
hits, you can see that the id parameter of the action method equals the
id of that specific member:
Breakpoint
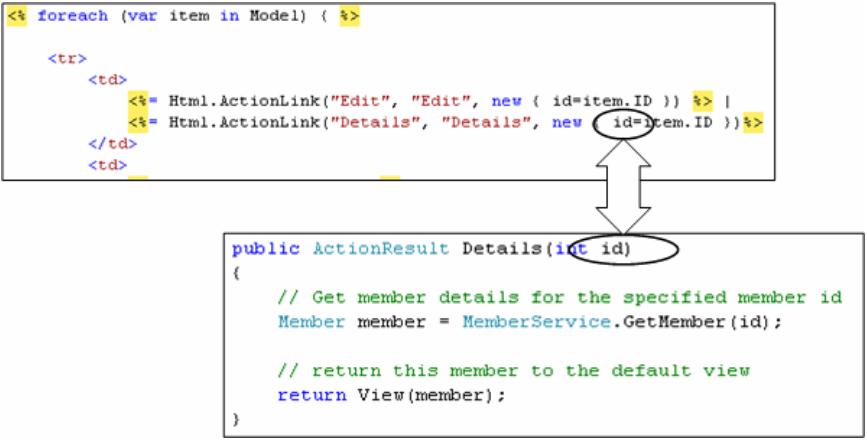
Model binding
My MVC application
<%=Html.ActionLink("Back to List", "Index") %>
Task 2: making the Create New link work
First, update our Model code so that we can create a new member. Open the MemberService class in the Model folder, and add the following method:public static void CreateMember(Member member)
{
// Set member id to next free id
member.ID = members.Max(m => m.ID) + 1;
// add member to collection
members.Add(member);
}
This method takes care of adding a new member to the collection and making sure it gets a valid id.Then, in the Index.aspx view in the Views/Members folder, the Create New link looks like:
<%= Html.ActionLink("Create New", "Create") %>
The second parameter is the name of the action method, so this means
that we have to create a new action method Create in the
MembersController class (if we don’t specify the controller name
explicitly, it will take the current one, which is fine in this case):public ActionResult Create()
{
return View();
}
If the Create New link is clicked, the Create action method of the
MembersController will be executed, and in this method we just return
the default view for creating new members. This view does not exist yet,
so right click the Create action method and select Add View, and make
sure everything is filled in as follows: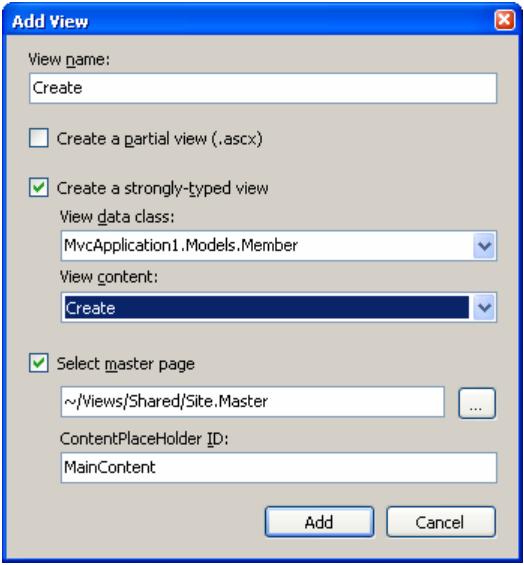
Add view
- The View name is called Create.
- You check the Create a strongly typed view check box, and set the View data class to MvcApplication1.Models.Member. This way, we will be able to access the member data in the view in a strongly typed way.
- Select Create as the View content. This will generate code that displays the creation of a member.
<%@ Page Title="" Language="C#" MasterPageFile="~/Views/Shared/Site.Master" Inherits="System.Web.Mvc.ViewPage< MvcApplication1.Models.Member>" %> <asp:Content ID="Content1" ContentPlaceHolderID="TitleContent" runat="server"> Create </asp:Content> <asp:Content ID="Content2" ContentPlaceHolderID="MainContent" runat="server"> <h2>Create</h2> <%= Html.ValidationSummary("Create was unsuccessful. Please correct the errors and try again.") %> <% using (Html.BeginForm()) {%> <fieldset> <legend>Fields</legend> <p> <label for="ID">ID:</label> <%= Html.TextBox("ID") %> <%= Html.ValidationMessage("ID", "*") %> </p> <p> <label for="FirstName">FirstName:</label> <%= Html.TextBox("FirstName") %> <%= Html.ValidationMessage("FirstName", "*") %> </p> <p> <label for="LastName">LastName:</label> <%= Html.TextBox("LastName") %> <%= Html.ValidationMessage("LastName", "*") %> </p> <p> <input type="submit" value="Create" /> </p> </fieldset> <% } %> <div> <%=Html.ActionLink("Back to List", "Index") %> </div> </asp:Content>To try this view, run the application, go to http://localhost:3382/members/index and click the Create New link. Or, immediately type in the url http://localhost:3382/members/Create:
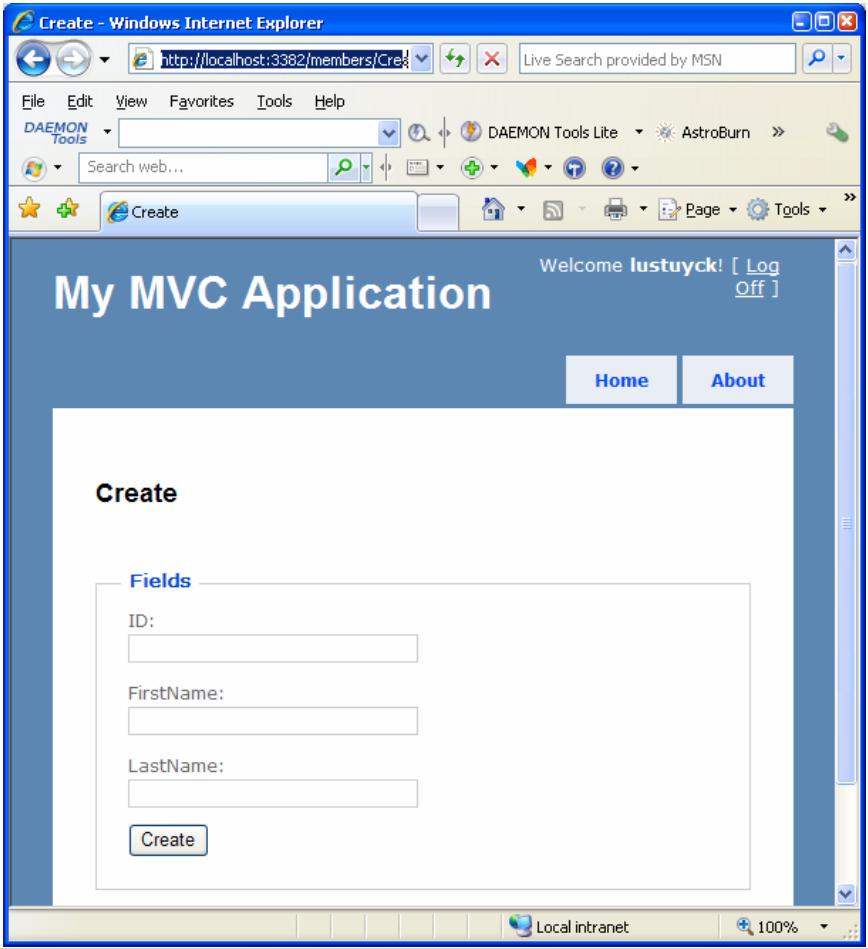
My MVC application
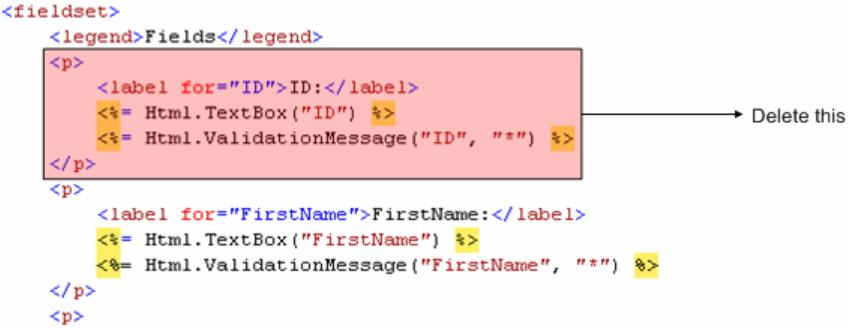
Delete part
Also notice the Html.BeginForm statement:
<% using (Html.BeginForm()) {%>
which will generate a form-element:<form action=”/members/Create” method=”post”></form>
So, when the Create button is clicked (which is of input type submit), a new POST request to http://localhost/members/create
is triggered and all form data will be passed with it. This means that
the action method Create of the MembersController will be executed. But
hold on… again? When we clicked the Create New link previously, this
same action method was executed? What is happening?To understand how it works, you have to know the difference between GET and POST requests. When we clicked the Create New link, a new GET request was triggered, causing the Create action method to execute. We could have explicitly written the Create action method as:
[AcceptVerbs(HttpVerbs.Get)]
public ActionResult Create()
{
    return View();
}
If you don’t specify the AcceptVerbs attribute, it defaults to
HttpVerbs.Get. That’s why the Create New link executes the Create action
method when clicked.But now, when clicking the Create button, we have the intention of creating a new member – which is potentially an unsafe operation, and therefore should be handled by a POST request instead of a GET request. Indeed, the generated Create button triggers a POST request, and in order to handle it, we have to create a new Create action method in the MembersController but this time decorated with HttpVerbs.Get, and accepting a member parameter.
[AcceptVerbs(HttpVerbs.Post)]
public ActionResult Create(Member member)
{
    // Use model to create this new member
    MemberService.CreateMember(member);
    // Redirect to Details action method and pass the new id
    return RedirectToAction("Details", new { id = member.ID });
}
Again, thanks to model binding the member parameter is created and
its properties (FirstName and LastName) are initialized with the data
from the form – so we don’t have to do anything special to get the data
out of the request. Then, the model is used to actually create the new
member and then a RedirectToAction result is returned to trigger a
redirection passing the name of the action method to redirect to
(Details) and the data to be passed to this action method (the id).Previously we already wrote this Details action method, so it will already work: when the new member is created, its details will be shown.
Test it: run the application, and create a new member:
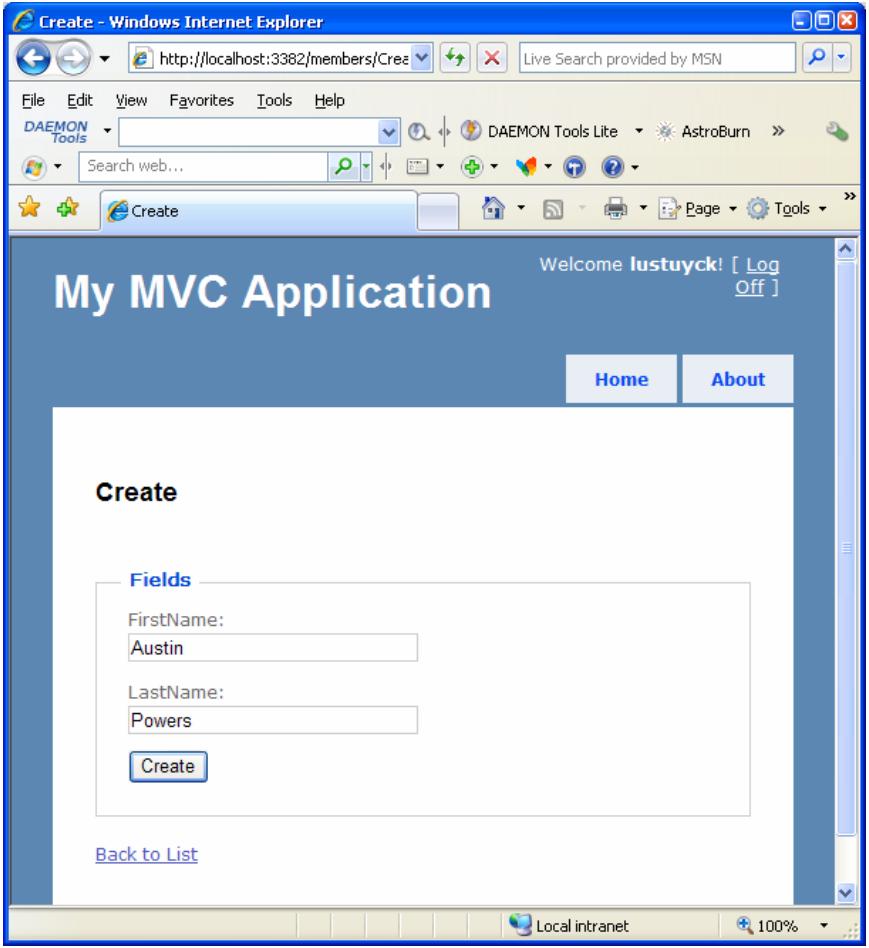
My MVC application
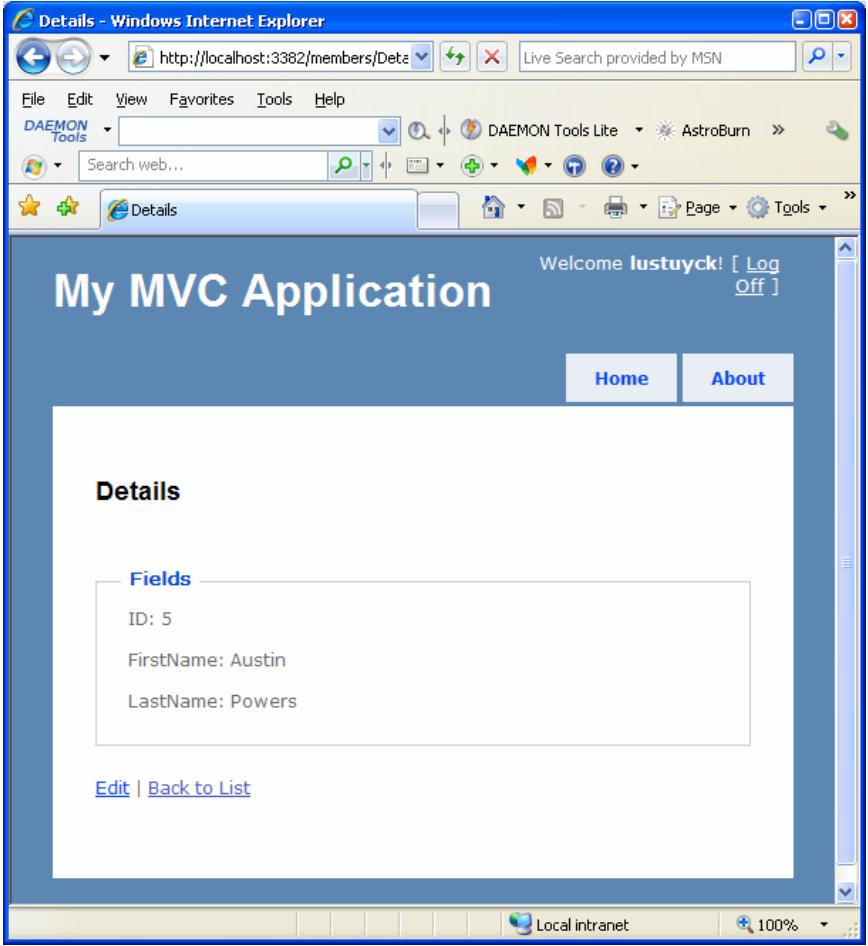
My MVC application
My MVC application
Task 3: making the Edit link work
Update our Model code so that we can update an existing member. Open the MemberService class in the Model folder, and add the following method:public static void UpdateMember(Member member)
{
// Find member in collection
Member foundMember = members.Find(m => m.ID == member.ID);
// Update member
foundMember.FirstName = member.FirstName;
foundMember.LastName = member.LastName;
}
The Edit link in the Index.aspx view looked like:<%= Html.ActionLink("Edit", "Edit", new { id=item.ID }) %>
This means that we have to add a new action method called Edit to the
MembersController that will handle the GET request (and show the form
to edit a member):[AcceptVerbs(HttpVerbs.Get)]
public ActionResult Edit(int id)
{
// Get member details using model
Member member = MemberService.GetMember(id);
// Return default view and pass member
return View(member);
}
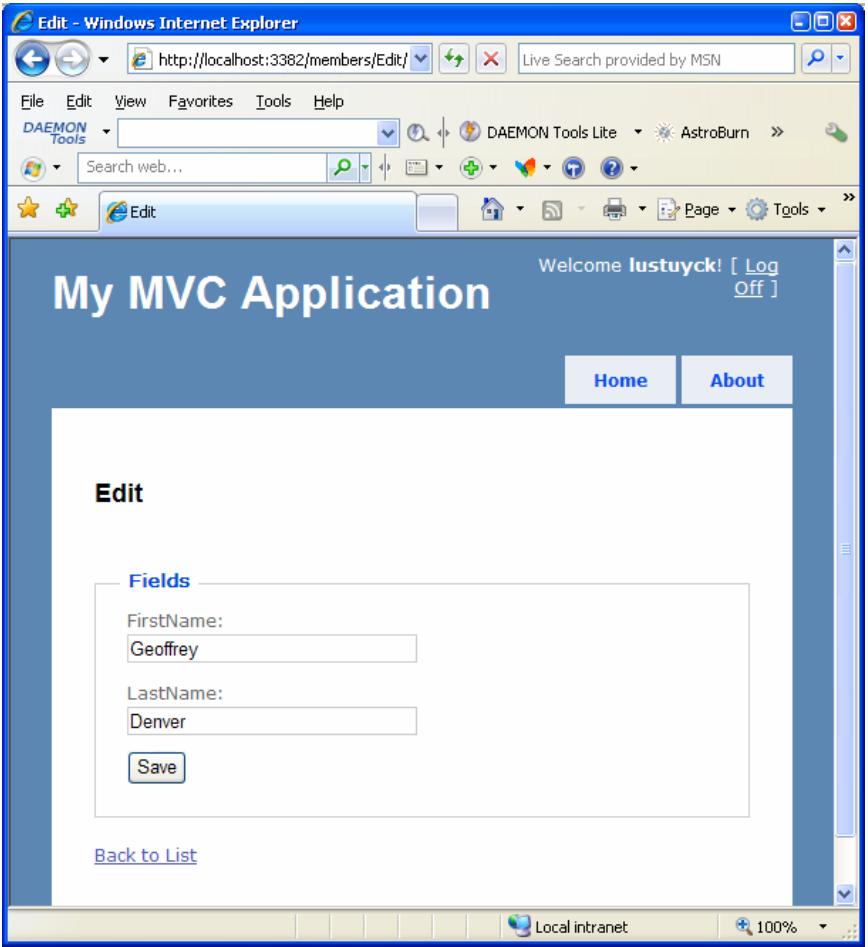
If the Edit link is clicked, the Edit action method of the
MembersController will be executed, and in this method we first get the
member details for the passed member id, and then return the default
view for editing a member. This view does not exist yet, so right click
the Edit action method and select Add View, and make sure everything is
filled in as follows: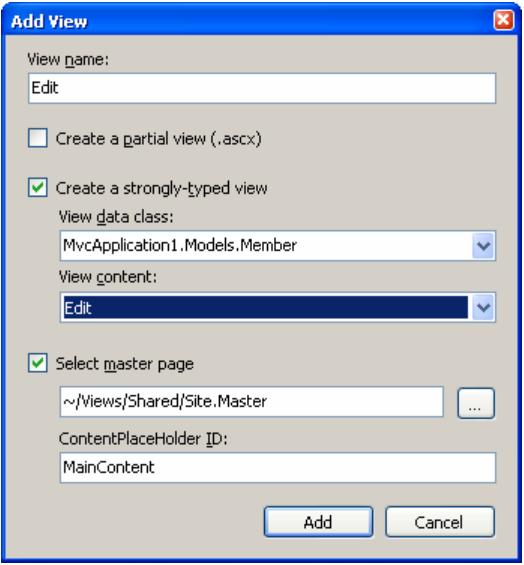
Add view
- The View name is called Edit.
- You check the Create a strongly typed view check box, and set the View data class to MvcApplication1.Models.Member. This way, we will be able to access the member data in the view in a strongly typed way.
- Select Edit as the View content. This will generate code that displays the editing of a member.
My MVC application
Add new action method called Edit again but this time to handle POST request (and actually saves the updated member using the model). Open the MembersController class and add the following action method:
[AcceptVerbs(HttpVerbs.Post)]
public ActionResult Edit(Member member)
{
    // Use model to update this existing member
    MemberService.UpdateMember(member);
    // Redirect to Details action method and pass the id
    return RedirectToAction("Details", new { id = member.ID });
}
Run the application again, and rename Loren Lyle to Laura Lyle: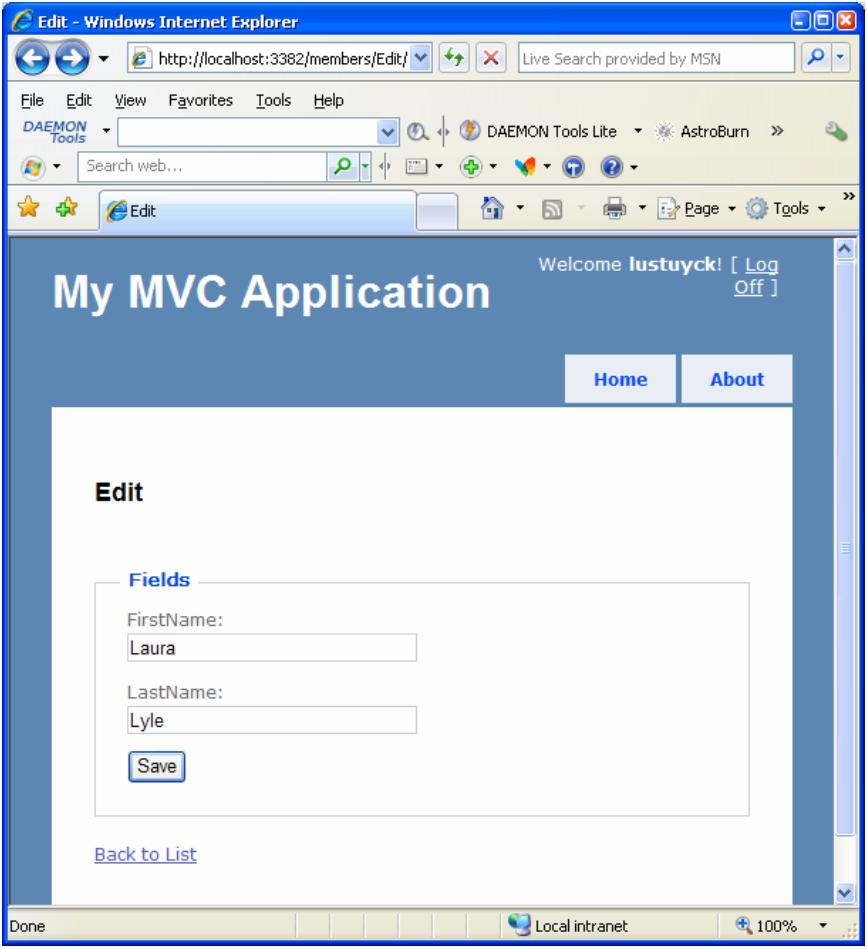
My MVC application
My MVC application
My MVC application
Task 4: making the Delete link work
As always, first update our Model code so that we can delete an existing member. Open the MemberService class in the Model folder, and add the following method:public static void DeleteMember(int id)
{
// Find member in collection
Member memberToDelete = GetMember(id);
// Delete member
members.Remove(memberToDelete);
}
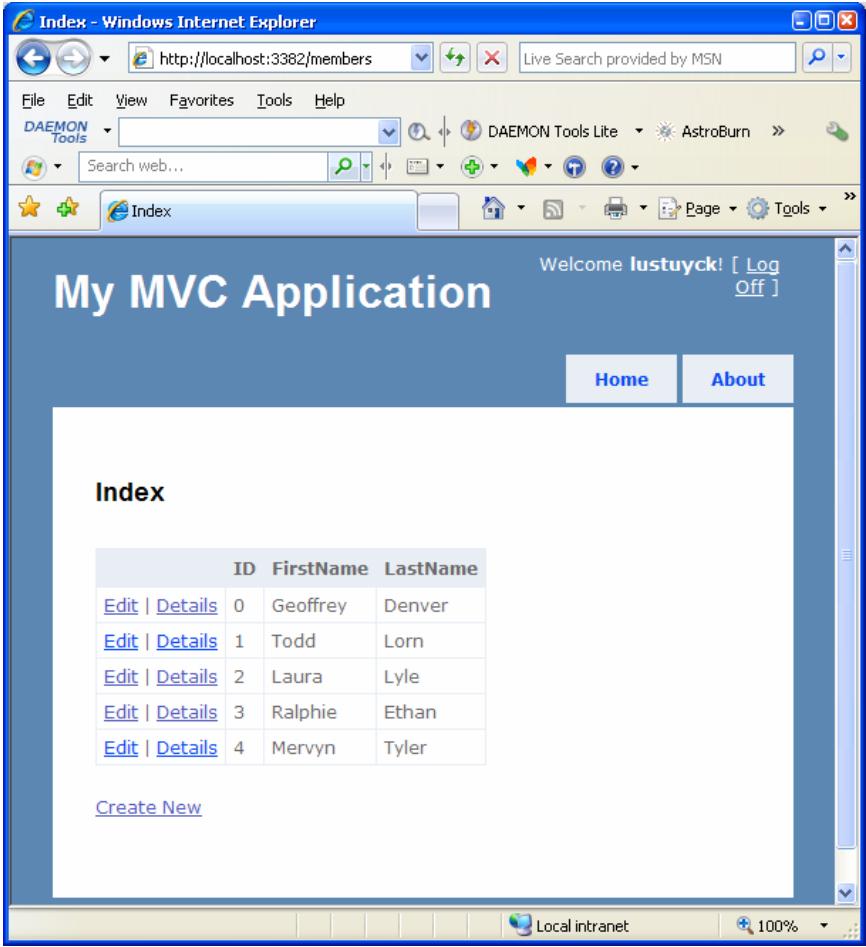
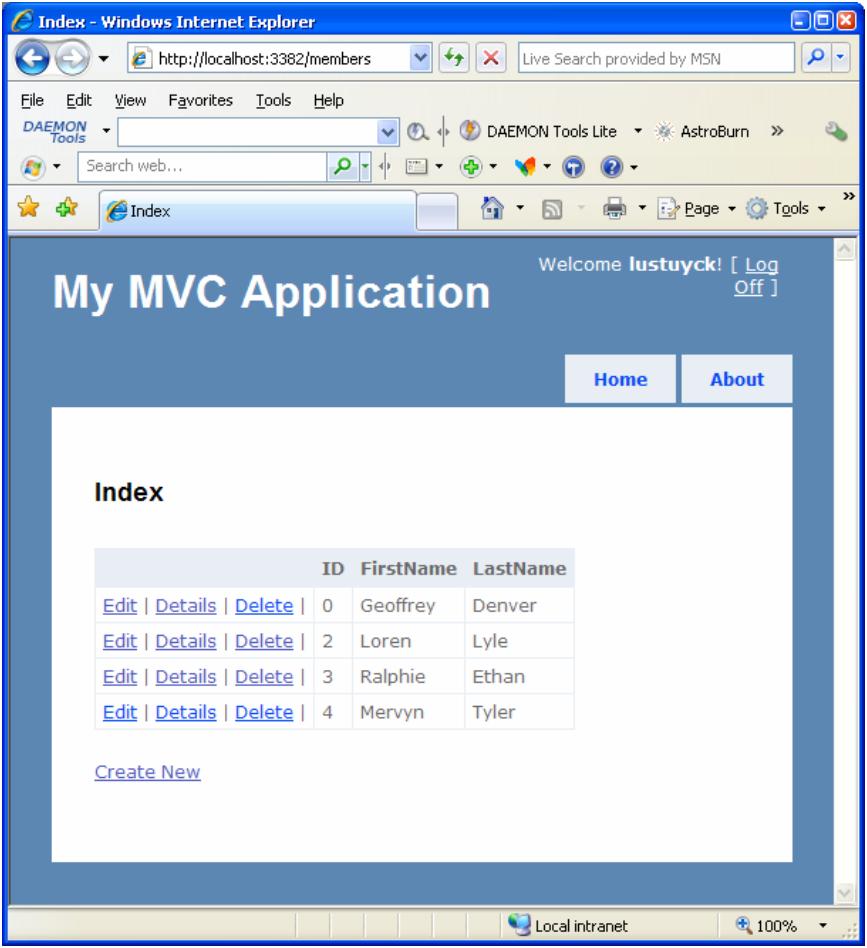
There wasn’t a Delete link in the Index.aspx view yet, so we will add it now:
Add delete link
[AcceptVerbs(HttpVerbs.Get)]
public ActionResult Delete(int id)
{
    // Get member details using model
    Member member = MemberService.GetMember(id);
    // Return default view and pass member
    return View(member);
}
If the Delete link is clicked, the Delete action method of the
MembersController will be executed, and in this method we first get the
member details for the passed member id, and then return the default
view for deleting a member. This view does not exist yet, so right click
the Delete action method and select Add View, and make sure everything
is filled in as follows: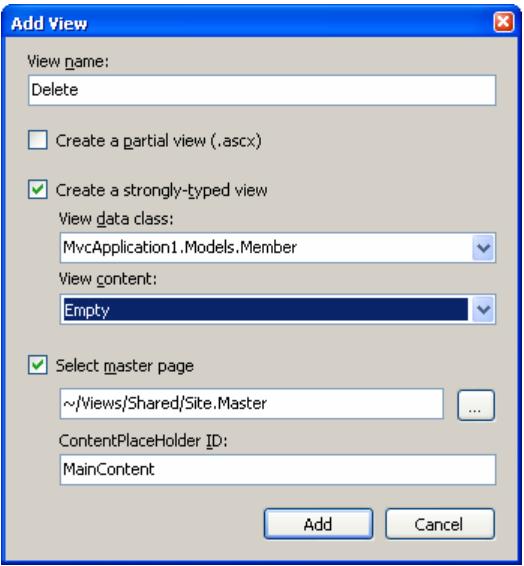
Add view
- The View name is called Delete.
- You check the Create a strongly typed view check box, and set the View data class to MvcApplication1.Models.Member. This way, we will be able to access the member data in the view in a strongly typed way.
- Select Empty as the View content. We will add some HTML manually.
<%@ Page Title="" Language="C#"
         MasterPageFile="~/Views/Shared/Site.Master"
         Inherits="System.Web.Mvc.ViewPage<
                      MvcApplication1.Models.Member>" %>
<asp:Content ID="Content1" ContentPlaceHolderID="TitleContent"
             runat="server">
 Delete
</asp:Content>
<asp:Content ID="Content2" ContentPlaceHolderID="MainContent"
             runat="server">
    <h2>Delete</h2>

    Do you really want to delete <% = Model.FirstName %> <% =
    Model.LastName %>?

    <% using (Html.BeginForm(new { id = Model.ID }))
       { %>
       <p>
            <input type="submit" value="Delete" />
        </p>
    <% } %>
    <div>
        <%=Html.ActionLink("Back to List", "Index") %>
    </div>
</asp:Content>
To handle the actual Delete, add new action method called Delete again but this time to handle POST request (and actually deletes the requested member using the model). Open the MembersController class and add the following action method:
[AcceptVerbs(HttpVerbs.Post)]
public ActionResult Delete(Member member)
{
    // Use model to delete this existing member
    MemberService.DeleteMember(member.ID);
    // Redirect to Index action method
    return RedirectToAction("Index");
}
That should do it! Run the application, and delete the member Todd Lorn: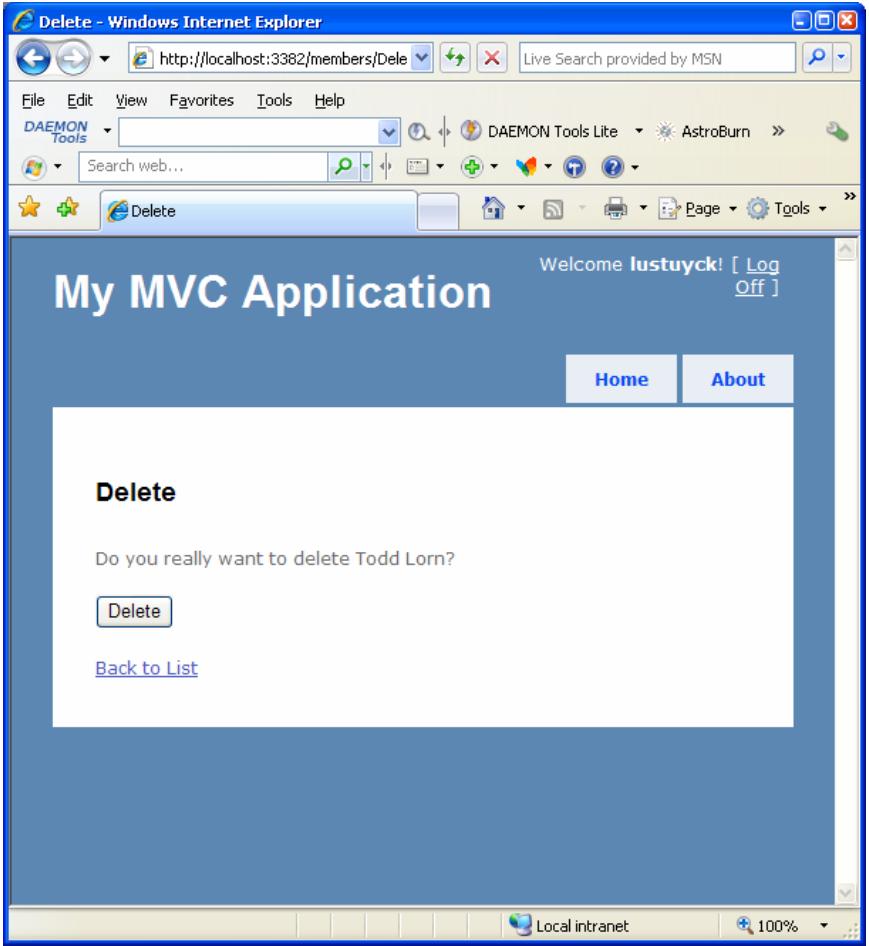
My MVC application
My MVC application
Do not take it easy.I have got your address from your blog.Then its easy for me to give a case in police station against you.your all article copied from code project or different Blogs.You have five day in your hand delete your blog or delete all content otherwise you have to penalized to jail and your carrier may be stop.Be serious and delete it as soon as possible.Scott Microsoft Team Member
ReplyDelete