Thursday 26 June 2014

read only view in sql server

create view v as select eid,name from emp union select 0,'select' where 1=2

create view v as select eid,name from emp where eid>100 with check option
constraint in sql server

CREATE TABLE EMP123
(

            EMPNO INT PRIMARY KEY,

            ENAME VARCHAR(30) DEFAULT 'NOT KNOWN',

            DOB DATETIME NOT NULL,

            HIREDATE DATETIME,

            EMAIL VARCHAR(50) UNIQUE ,

            MOBILE VARCHAR(10) UNIQUE,

            SAL    NUMERIC(13,2) CHECK (SAL>5000 AND SAL<500000),

            DEPTNO INT FOREIGN KEY REFERENCES DEPT(DEPTNO) on  delete cascade

)

Saturday 21 June 2014

Example of Universal character set Transformation Format(UTF) in C#.net

using System;
using System.Collections.Generic;
using System.ComponentModel;
using System.Data;
using System.Drawing;
using System.Linq;
using System.Text;
using System.Windows.Forms;
using System.Security;
using System.Security.Cryptography;

namespace WindowsFormsApplication1
{
    public partial class Form1 : Form
    {
        public Form1()
        {
            InitializeComponent();
        }

        private void Form1_Load(object sender, EventArgs e)
        {


        }
        public static string EncryptData(string Message)
        {
            byte[] Results;
            System.Text.UTF8Encoding UTF8 = new System.Text.UTF8Encoding();
            MD5CryptoServiceProvider HashProvider = new MD5CryptoServiceProvider();
            byte[] TDESKey = HashProvider.ComputeHash(UTF8.GetBytes("14klfdsalk"));
            TripleDESCryptoServiceProvider TDESAlgorithm = new TripleDESCryptoServiceProvider();
            TDESAlgorithm.Key = TDESKey;
            TDESAlgorithm.Mode = CipherMode.ECB;
            TDESAlgorithm.Padding = PaddingMode.PKCS7;
            byte[] DataToEncrypt = UTF8.GetBytes(Message);
            try
            {
                ICryptoTransform Encryptor = TDESAlgorithm.CreateEncryptor();
                Results = Encryptor.TransformFinalBlock(DataToEncrypt, 0, DataToEncrypt.Length);
            }
            finally
            {
                TDESAlgorithm.Clear();
                HashProvider.Clear();
            }
            return Convert.ToBase64String(Results);
        }
        public static string DecryptString(string Message)
        {
            byte[] Results;
            System.Text.UTF8Encoding UTF8 = new System.Text.UTF8Encoding();
            MD5CryptoServiceProvider HashProvider = new MD5CryptoServiceProvider();
            byte[] TDESKey = HashProvider.ComputeHash(UTF8.GetBytes("14klfdsalk"));
            TripleDESCryptoServiceProvider TDESAlgorithm = new TripleDESCryptoServiceProvider();
            TDESAlgorithm.Key = TDESKey;
            TDESAlgorithm.Mode = CipherMode.ECB;
            TDESAlgorithm.Padding = PaddingMode.PKCS7;
            byte[] DataToDecrypt = Convert.FromBase64String(Message);
            try
            {
                ICryptoTransform Decryptor = TDESAlgorithm.CreateDecryptor();
                Results = Decryptor.TransformFinalBlock(DataToDecrypt, 0, DataToDecrypt.Length);
            }
            finally
            {
                TDESAlgorithm.Clear();
                HashProvider.Clear();
            }
            return UTF8.GetString(Results);
        }

        private void button1_Click(object sender, EventArgs e)
        {
            textBox2.Text = EncryptData(textBox1.Text);
        }

        private void button2_Click(object sender, EventArgs e)
        {
            textBox4.Text = DecryptString(textBox3.Text);
        }
    }
}


Example of (Secure Hash Algorithm)SHA in c#.net

using System;
using System.Collections.Generic;
using System.ComponentModel;
using System.Data;
using System.Drawing;
using System.Linq;
using System.Text;
using System.Windows.Forms;
using System.Security.Cryptography;

namespace WindowsFormsApplication3
{
    public partial class Form1 : Form
    {
        public Form1()
        {
            InitializeComponent();
        }

        private void Form1_Load(object sender, EventArgs e)
        {
            HASobj = new HAS("abc");
            string s = obj.EncryptData("jay jagannath");
            MessageBox.Show(s);
            string t = obj.DecryptData(s);
            MessageBox.Show(t);

        }
    }
    class HAS
    {
        TripleDESCryptoServiceProvider tripleDes = new TripleDESCryptoServiceProvider();
        public PISOFTEKHAS(string key)
        {
            tripleDes.Key = TruncateHash(key, tripleDes.KeySize / 8);
            tripleDes.IV = TruncateHash("", tripleDes.BlockSize / 8);
        }

        private byte[] TruncateHash(string key, int length)
        {
            SHA1CryptoServiceProvider sha1 = new SHA1CryptoServiceProvider();
            byte[] keyBytes = System.Text.Encoding.Unicode.GetBytes(key);
            byte[] hash = sha1.ComputeHash(keyBytes);
            Array.Resize(ref hash, length);
            return hash;
        }

        public string EncryptData(string plaintext)
        {
            byte[] plaintextBytes = System.Text.Encoding.Unicode.GetBytes(plaintext);
            System.IO.MemoryStream ms = new System.IO.MemoryStream();
            CryptoStream encStream = new CryptoStream(ms, tripleDes.CreateEncryptor(), System.Security.Cryptography.CryptoStreamMode.Write);
            encStream.Write(plaintextBytes, 0, plaintextBytes.Length);
            encStream.FlushFinalBlock();
            return Convert.ToBase64String(ms.ToArray());
        }

        public string DecryptData(string encryptedtext)
        {
            byte[] encryptedBytes = Convert.FromBase64String(encryptedtext);
            System.IO.MemoryStream ms = new System.IO.MemoryStream();
            CryptoStream decStream = new CryptoStream(ms, tripleDes.CreateDecryptor(), System.Security.Cryptography.CryptoStreamMode.Write);
            decStream.Write(encryptedBytes, 0, encryptedBytes.Length);
            decStream.FlushFinalBlock();
            return System.Text.Encoding.Unicode.GetString(ms.ToArray());
        }


    }

}


Example of Advanced Encryption Standard (AES) in c#.net

using System;
using System.Collections.Generic;
using System.ComponentModel;
using System.Data;
using System.Drawing;
using System.Linq;
using System.Text;
using System.Windows.Forms;
using System.Security.Cryptography;
using System.IO;

namespace WindowsFormsApplication2
{
    public partial class Form1 : Form
    {
        public Form1()
        {
            InitializeComponent();
        }

        private void Form1_Load(object sender, EventArgs e)
        {
            try
            {

                string original = "jay jagannath";
                using (Aes myAes = Aes.Create())
                {
                    byte[] encrypted = EncryptStringToBytes_Aes(original, myAes.Key, myAes.IV);
                    string roundtrip = DecryptStringFromBytes_Aes(encrypted, myAes.Key, myAes.IV);
                    MessageBox.Show(roundtrip.ToString());
                }

            }
            catch (Exception ex)
            {
                MessageBox.Show(ex.ToString());
            }

        }
        static string DecryptStringFromBytes_Aes(byte[] cipherText, byte[] Key, byte[] IV)
        {

            if (cipherText == null || cipherText.Length <= 0)
                throw new ArgumentNullException("cipherText");
            if (Key == null || Key.Length <= 0)
                throw new ArgumentNullException("Key");
            if (IV == null || IV.Length <= 0)
                throw new ArgumentNullException("Key");
            string plaintext = null;
            using (Aes aesAlg = Aes.Create())
            {
                aesAlg.Key = Key;
                aesAlg.IV = IV;
                ICryptoTransform decryptor = aesAlg.CreateDecryptor(aesAlg.Key, aesAlg.IV);
                using (MemoryStream msDecrypt = new MemoryStream(cipherText))
                {
                    using (CryptoStream csDecrypt = new CryptoStream(msDecrypt, decryptor, CryptoStreamMode.Read))
                    {
                        using (StreamReader srDecrypt = new StreamReader(csDecrypt))
                        {
                            plaintext = srDecrypt.ReadToEnd();
                        }
                    }
                }

            }

            return plaintext;

        }

        static byte[] EncryptStringToBytes_Aes(string plainText, byte[] Key, byte[] IV)
        {

            if (plainText == null || plainText.Length <= 0)
                throw new ArgumentNullException("plainText");
            if (Key == null || Key.Length <= 0)
                throw new ArgumentNullException("Key");
            if (IV == null || IV.Length <= 0)
                throw new ArgumentNullException("Key");
            byte[] encrypted;
            using (Aes aesAlg = Aes.Create())
            {
                aesAlg.Key = Key;
                aesAlg.IV = IV;
                ICryptoTransform encryptor = aesAlg.CreateEncryptor(aesAlg.Key, aesAlg.IV);


                using (MemoryStream msEncrypt = new MemoryStream())
                {
                    using (CryptoStream csEncrypt = new CryptoStream(msEncrypt, encryptor, CryptoStreamMode.Write))
                    {
                        using (StreamWriter swEncrypt = new StreamWriter(csEncrypt))
                        {
                            swEncrypt.Write(plainText);
                        }
                        encrypted = msEncrypt.ToArray();
                    }
                }
            }
            return encrypted;

        }


    }
}


WCF question and answer

What are contracts in WCF?
Service contracts

Describe which operations the client can perform on the service.
There are two types of Service Contracts.
ServiceContract - This attribute is used to define the Interface.
OperationContract - This attribute is used to define the method inside Interface.

Data contracts

Define which data types are passed to and from the service. WCF defines implicit contracts for built-in types such as int and string, but we can easily define explicit opt-in data contracts for custom types.

There are two types of Data Contracts.
DataContract - attribute used to define the class
DataMember - attribute used to define the properties.

Fault contracts

Define which errors are raised by the service, and how the service handles and propagates errors to its clients.

Message contracts

Allow the service to interact directly with messages. Message contracts can be typed or untyped, and are useful in interoperability cases and when there is an existing message format we have to comply with.

What is address in WCF and how many types of transport schemas are there in WCF?
WCF supports following transport schemas

HTTP
TCP
Peer network
IPC (Inter-Process Communication over named pipes)
MSMQ
Where we can host WCF services?
1. IIS
2. Self Hosting
3. WAS (Windows Activation Service)

What is binding and how many types of bindings are there in WCF?

A binding defines how an endpoint communicates to the world. A binding defines the transport (such as HTTP or TCP) and the encoding being used (such as text or binary). A binding can contain binding elements that specify details like the security mechanisms used to secure messages, or the message pattern used by an endpoint.

WCF supports nine types of bindings.

Basic binding

Offered by the BasicHttpBinding class, this is designed to expose a WCF service as a legacy ASMX web service, so that old clients can work with new services. When used by the client, this binding enables new WCF clients to work with old ASMX services.

TCP binding

Offered by the NetTcpBinding class, this uses TCP for cross-machine communication on the intranet. It supports a variety of features, including reliability, transactions, and security, and is optimized for WCF-to-WCF communication. As a result, it requires both the client and the service to use WCF.


Peer network binding

Offered by the NetPeerTcpBinding class, this uses peer networking as a transport. The peer network-enabled client and services all subscribe to the same grid and broadcast messages to it.


IPC binding

Offered by the NetNamedPipeBinding class, this uses named pipes as a transport for same-machine communication. It is the most secure binding since it cannot accept calls from outside the machine and it supports a variety of features similar to the TCP binding.


Web Service (WS) binding

Offered by the WSHttpBinding class, this uses HTTP or HTTPS for transport, and is designed to offer a variety of features such as reliability, transactions, and security over the Internet.


Federated WS binding

Offered by the WSFederationHttpBinding class, this is a specialization of the WS binding, offering support for federated security.


Duplex WS binding

Offered by the WSDualHttpBinding class, this is similar to the WS binding except it also supports bidirectional communication from the service to the client.


MSMQ binding

Offered by the NetMsmqBinding class, this uses MSMQ for transport and is designed to offer support for disconnected queued calls.


MSMQ integration binding

Offered by the MsmqIntegrationBinding class, this converts WCF messages to and from MSMQ messages, and is designed to interoperate with legacy MSMQ clients.

webhttp binding
This binding uses for rest full service

What are WCF Service Endpoints? Explain.

For Windows Communication Foundation services to be consumed, it’s necessary that it must be exposed; Clients need information about service to communicate with it. This is where service endpoints play their role.

A WCF service endpoint has three basic elements i.e. Address, Binding and Contract.

Address: It defines "WHERE". Address is the URL that identifies the location of the service.
Binding: It defines "HOW". Binding defines how the service can be accessed.
Contract: It defines "WHAT". Contract identifies what is exposed by the service.
What is the address formats of the WCF transport schemas?

Address format of WCF transport schema always follow

[transport]://[machine or domain][:optional port] format.

for example:

HTTP Address Format

http://localhost:8888
the way to read the above url is

"Using HTTP, go to the machine called localhost, where on port 8888 someone is waiting"
When the port number is not specified, the default port is 80.

TCP Address Format

net.tcp://localhost:8888/MyService

When a port number is not specified, the default port is 808:

net.tcp://localhost/MyService

NOTE: Two HTTP and TCP addresses from the same host can share a port, even on the same machine.

IPC Address Format
net.pipe://localhost/MyPipe

We can only open a named pipe once per machine, and therefore it is not possible for two named pipe addresses to share a pipe name on the same machine.

MSMQ Address Format
net.msmq://localhost/private/MyService
net.msmq://localhost/MyService

What Message Exchange Patterns (MEPs) supported by WCF? Explain each of them briefly.

1. Request/Response 2. One Way 3. Duplex

Request/Response

It’s the default pattern. In this pattern, a response message will always be generated to consumer when the operation is called, even with the void return type. In this scenario, response will have empty SOAP body.

One Way

In some cases, we are interested to send a message to service in order to execute certain business functionality but not interested in receiving anything back. OneWay MEP will work in such scenarios. If we want queued message delivery, OneWay is the only available option.

Duplex

The Duplex MEP is basically a two-way message channel. In some cases, we want to send a message to service to initiate some longer-running processing and require a notification back from service in order to confirm that the requested process has been completed.

Please explain briefly different Instance Modes in WCF?

WCF will bind an incoming message request to a particular service instance, so the available modes are:

Per Call: instance created for each call, most efficient in term of memory but need to maintain session.
Per Session: Instance created for a complete session of a user. Session is maintained.
Single: Only one instance created for all clients/users and shared among all.Least efficient in terms of memory.

What are different elements of WCF Srevices Client configuration file?

WCF Services client configuration file contains endpoint, address, binding and contract. A sample client config file looks like

<system.serviceModel>

   <client>

      <endpoint name = "MyEndpoint"

         address  = "http://localhost:8000/MyService/"

         binding  = "wsHttpBinding"

         contract = "IMyContract"

      />

   </client>

</system.serviceModel>

How to configure Reliability while communicating with WCF Services?

Reliability can be configured in the client config file by adding reliableSession under binding tag.

<system.serviceModel>

   <services>

      <service name = "MyService">

         <endpoint

            address  = "net.tcp://localhost:8888/MyService"

            binding  = "netTcpBinding"

            bindingConfiguration = "ReliableCommunication"

            contract = "IMyContract"

         />

      </service>

   </services>

   <bindings>

      <netTcpBinding>

         <binding name = "ReliableCommunication">

            <reliableSession enabled = "true"/>

         </binding>

      </netTcpBinding>

   </bindings>

</system.serviceModel>


Reliability is supported by following bindings only

NetTcpBinding
WSHttpBinding
WSFederationHttpBinding
WSDualHttpBinding
How to set the timeout property for the WCF Service client call?

The timeout property can be set for the WCF Service client call using binding tag.

<client>

   <endpoint

      ...

      binding = "wsHttpBinding"

      bindingConfiguration = "LongTimeout"

      ...

   />

</client>

<bindings>

   <wsHttpBinding>

      <binding name = "LongTimeout" sendTimeout = "00:04:00"/>

   </wsHttpBinding>

</bindings>

Please explain different modes of security in WCF? Or Explain the difference between Transport and Message Level Security.

In Windows Communication Foundation, we can configure to use security at different levels

a. Transport Level security means providing security at the transport layer itself. When dealing with security at Transport level, we are concerned about integrity, privacy and authentication of message as it travels along the physical wire. It depends on the binding being used that how WCF makes it secure because most of the bindings have built-in security.

 Collapse | Copy Code
            <netTcpBinding>
            <binding name="netTcpTransportBinding">
               <security mode="Transport">
                          <Transport clientCredentialType="Windows" />
               </security>
            </binding>
            </netTcpBinding>
b. Message Level Security For Tranport level security, we actually ensure the transport that is being used should be secured but in message level security, we actually secure the message. We encrypt the message before transporting it.

 Collapse | Copy Code
             <wsHttpBinding>
             <binding name="wsHttpMessageBinding">
               <security mode="Message">
                           <Message clientCredentialType="UserName" />
               </security>
              </binding>
             </wsHttpBinding>
It totally depends upon the requirements but we can use a mixed security mode also as follows:

 Collapse | Copy Code
             <basicHttpBinding>
             <binding name="basicHttp">
               <security mode="TransportWithMessageCredential">
                          <Transport />
                               <Message clientCredentialType="UserName" />
               </security>
             </binding>
             </basicHttpBinding>


Friday 20 June 2014

MVC question and answer

1) in asp.net mvc3 world what me mean by "scaffolding"?
a) quickly generating a basic outline of your software that you can then edit and customize.
2) In what scenarious, the scaffolding package ins asp.net mvc can benifit an  individual or a team ?
a) if youre learning ASP.NET MVC for the first time, because it gives you a fast way to get some useful, working code, that you can then edit and adapt according to your needs. it saves you from the trauma of looking at a blank page and having no idea where to start.
a1) if you know asp.net mvc well and are now exploring some new add-on technology such as an object-relational mapper, a view engine, a tesing libray, etc. because the creator of that technology may have also created a scaffolding package for it.
a2) if your work involves repeatedly creating similar classes of files of some sort, because you can create custom scaffolders that output test fixtures, deployment scripts, or whatever else you need. Everyone on your team can use your custom scaffolders, too.
3) what is the name of NuGet scaffolding package for ASP.NET MVC3 scaffolding
a)MvcScaffolding
4)HTML 5 project Templattes are now part of ASP.NET MVC3 installation in vs10
a)Yes, That's correct The New Project dialog includes a checkbox enable HTML5  VERSIONS OF PROJECT TEMPLATES these templates leverage modernizr 1.2 to proviede compatibility support for HTML5 and css3 in Down-level browsers.
5) ASP.NET MVC3 comes with a new view engine named
a) Razor
6)Asp.net MVC3 has support for multiple view Engines
a)True
7)A New "ViewBag" property is introduced in ASP.NET MVC3. What is the purpose of this property?
a)In MVC3 View Bag property enables you to pass data to a view template using  a late-bound dictionary API. It is a dynamic property and you do n't need to define any strongly-typed classes to use the viewbag property.
8)ASP.NET MVC3 introduced a new actionresult called httpNotFoundResult
a)True.
9)ASP.NET MVC3 automatically installs and enables NuGet as part of its setup
a)True.
10) In ASP.NET MVC3 you can indicate whether you want a controller class to use session state, and if so whether session state should be read/write or read-only
a)True 

Mobile specific Views using jQuery Mobile

Starting with Internet Template

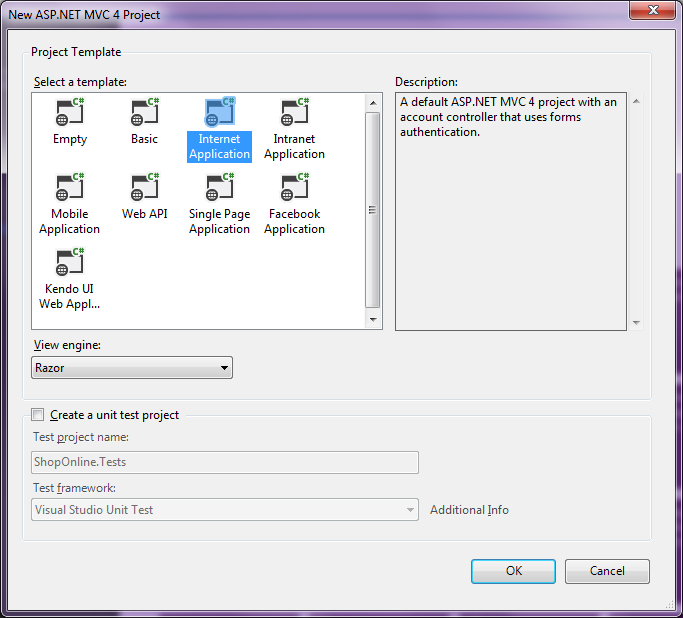
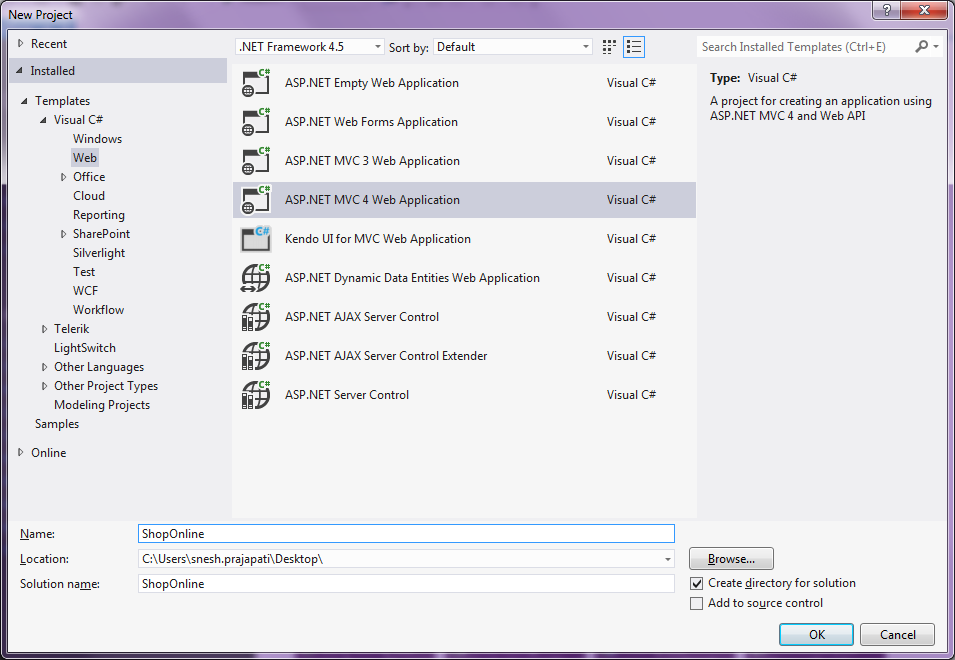
  1. Let us create a sample application by selecting ASP.NET MVC4 Web Application template and give it project name as ShopOnline and click "OK".Alternate way to achieve Modularization
  2. Select a template as Internet Application. Visual Studio 2012 adds a ShopOnline project in the solution as shown below in the screenshot:Alternate way to achieve Modularization

Installing 51Degrees.mobi

The user-agent header of incoming http request identifies the application requesting the information from the server, typically a browser. This string used for identification is called the user-agent string and contains tokens that provide specific details about the program making the request. To know more about user agent, please visit here.
There are two most widely used options to detect the browser:
  1. By registering Display Mode in App_Start as described at this blog.
  2. Using 51Degrees.mobi. Using this library device data, accurate screen sizes, input methods, plus manufacturer and model information are all available to application.
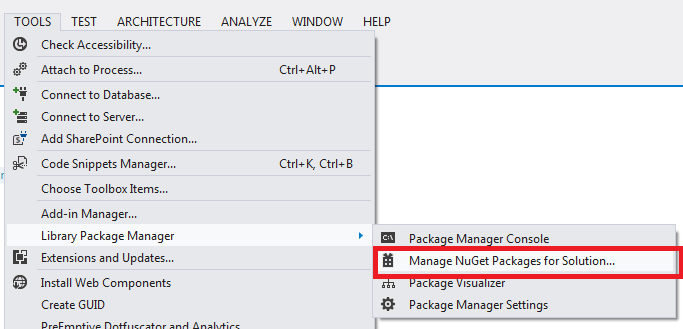
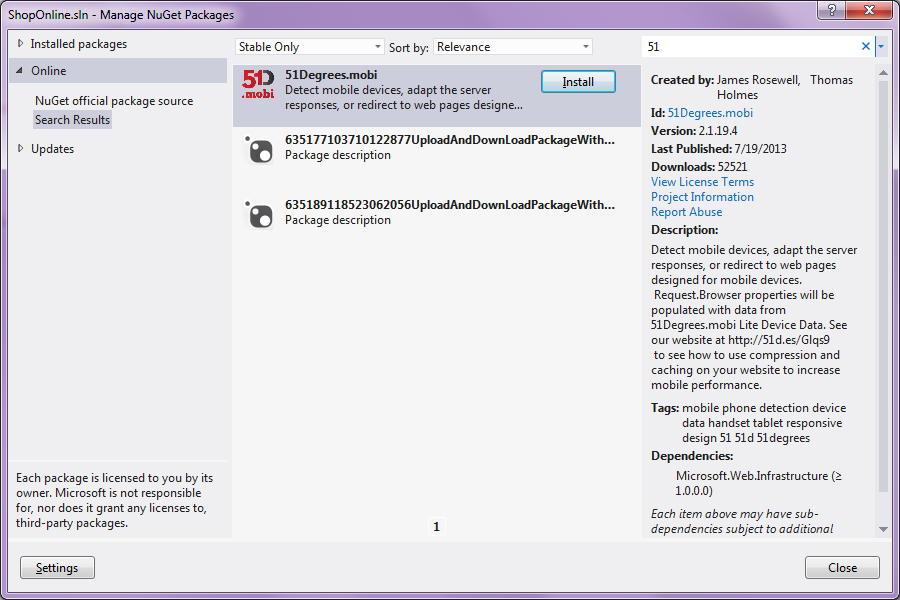
We will use 51Degrees.mobi here. There are two ways to install 51Degrees.mobi by using Nuget Packages Console or using Nuget Packages tool. Here we will install it by using NuGet packages tool. NuGet is an open source package manager tool which is inbuilt for Visual Studio 2010 and 2012. It downloads packages and required dependencies. There are following steps to download the 51Degrees.mobi:
  1. Click on TOOLS in Menu bar, go to "Library Package Manager" and the choose "Manage NuGet Packages for Solution" option as shown in the below screenshot.NuGet Manager UI
    From left hand side menu, select Online > All. Now click in the search text box at right hand side (top), and write “51”, in search the 51.Degrees.mobi would appear as shown below. Click on Install button appeared beside 51.Degrees.mobi.
    51Degrees.mobi Install
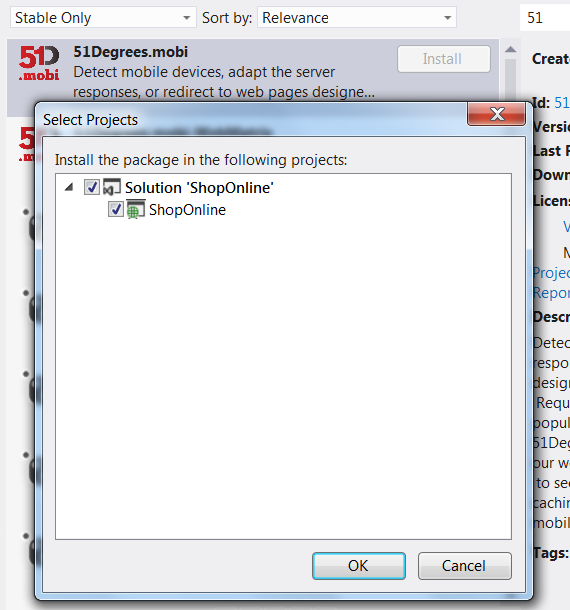
    It will give you a pop up for confirmation with project name as shown below, just click ok.
    Project Confirmation
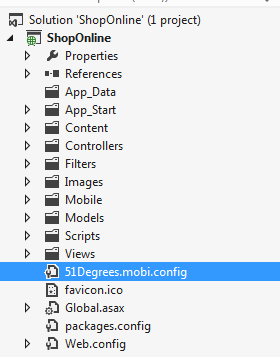
  2. Hope you will be able to see “51Degrees.mobi.config” file in your project as shown below:51Degrees.mobi Installed
  3. By default, it will create a “mobile” folder in application. We should delete that unnecessary folder and we will be having our mobile view in Views folder only.
  4. Open 51Degrees.mobi.config file and comment the following lines of code (as it is redirects the request from Mobiles to “~/mobile/default.aspx” which we do not want here).
    <redirect    
        firstRequestOnly="false" 
        mobileHomePageUrl="~/mobile/default.aspx"
        timeout="20"
        devicesFile="~/App_Data/Devices.dat"
        mobilePagesRegex="mobile">
    </redirect>
Using Nuget Package Manager Console

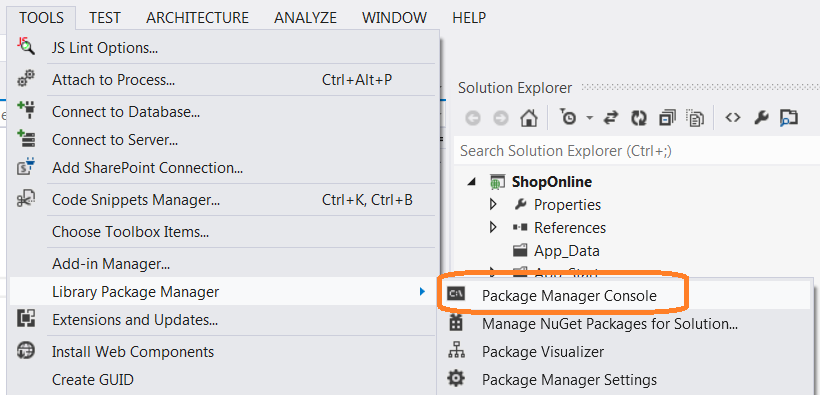
An alternate way to install 51Degrees.mobi is using “Nuget Package Manager Console”. You need to go to Top menu “TOOLS > Library Package Manager > Package Manager Console” as shown below:
NuGet Console UI
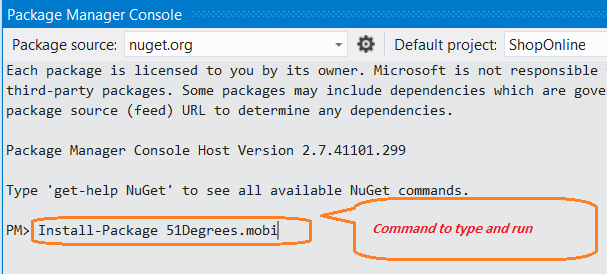
It will open a console window. Now you need to run the flowing command: Install-Package 51Degrees.mobi as shown below”:
Run Command for 51Degrees.mobi
It will do the same thing that you achieved from step 1 above. All things as shown in Step 2 would be added and then you need to follow steps 3 and 4 to remove unnecessary folder and setting. If you want to learn more about how 51Degrees.mobi works, please have a visit here and look into section "How does it work?"

Creating Models, ViewModel and Controller

  1. Inside Models folder, add three class files called CategoryProduct and DataRepository.
  2. In Category.cs, add the following code:
    public class Category
    {
        public int CategoryId { get; set; }
        public string CategoryName { get; set; }
    }
  3. In Product.cs, add the following code:
    public class Product
    {
        public int ProductId { get; set; }    
        public string ProductName { get; set; }
        public string ProductDescription { get; set; }
        public Category ProductCategory { get; set; }
    }
  4. In DataRepository.cs, add the following code:
    public class DataRepository
        {
            public List<Product> GetProducts()
            {
                List<Product> products = new List<Product>{ 
                        new Product () { ProductId = 1, ProductName = "Nokia Lumia 625", 
                            ProductDescription = "A mid-range Lumia with a focus of 
                            combining 4G with a large display (4.7 inch, the first time 
                            on a Lumia), yet keeping the price in a low and affordable range",
                        ProductCategory =  new Category () { CategoryId = 1, CategoryName = "Phones"}},
        
                        new Product () { ProductId = 2, ProductName = "Nokia Lumia 925", 
                            ProductDescription = "A thinner, lighter, partially aluminium 
                            re-skin of the Lumia 920, designed to broaden the appeal of the 92x range. 
                            It is a compromise between Lumia 920 and Lumia 928 features-wise.",
                        ProductCategory =  new Category () { CategoryId = 1, CategoryName = "Phones"}},
                        
                        new Product () {ProductId = 3, ProductName = "ThinkPad X1 Carbon Ultrabook", 
                            ProductDescription = "At less than 1.4 kg, the X1 Carbon Ultrabook™ 
                            brings a new level of quality to the ThinkPad legacy of high standards 
                            and innovation. A carbon fiber roll cage with reinforcement 
                            throughout makes this system ultralight, ultradurable, 
                            and highly portable. Stay unplugged all day, but when needed, 
                            boost your battery up to 80% capacity in just 35 minutes.",
                        ProductCategory = new Category () {CategoryId = 2, CategoryName = "Computers"}},
     
                        new Product () {ProductId = 4, ProductName = "ThinkPad X230 Laptop", 
                            ProductDescription = "Tough, slim and light, 
                            the 12.5 inch ThinkPad X230 elevates the business laptop to a new level 
                            with its vivid IPS display, purer sound and peerless keyboard ergonomics. 
                            Start faster, resume faster and charge your battery less, 
                            giving you more time to strive for success.",
                        ProductCategory = new Category () {CategoryId = 2, CategoryName = "Computers"}},
                        
                        new Product () {ProductId = 5, ProductName = "Programming ASP.NET MVC 4", 
                            ProductDescription = "Get up and running with ASP.NET MVC 4, 
                            and learn how to build modern server-side web applications. 
                            This guide helps you understand how the framework performs, 
                            and shows you how to use various features to solve many real-world 
                            development scenarios you’re likely to face.",
                        ProductCategory = new Category () {CategoryId = 3, CategoryName = "Books"}},
                        
                        new Product () {ProductId = 6, ProductName = "Pro ASP.NET MVC 4", 
                            ProductDescription = "In this fourth edition, 
                            the core model-view-controller (MVC) architectural concepts are not 
                            simply explained or discussed in isolation, but are demonstrated in action. 
                            You’ll work through an extended tutorial to create a working e-commerce 
                            web application that combines ASP.NET MVC with the latest 
                            C# language features and unit-testing best practices.",
                        ProductCategory = new Category () {CategoryId = 3, CategoryName = "Book"}}
               };
               
                return products;
            }
            
            public List<Category> GetCategories()
            {
                return new List<Category> {
                new Category () { CategoryId = 1, CategoryName = "Phones"},
                new Category () {CategoryId = 2, CategoryName = "Computers"},
                new Category () { CategoryId = 3, CategoryName = "Books"}
                };
            }
        }                
    For the sake of simplicity, we are using hardcoded data in Repository for demo purposes. In real time application, Repository is supposed to do CRUD operations by communication persistent data source like SQL Server, XML or whatever. For this demo, now our model and repository are ready for use.
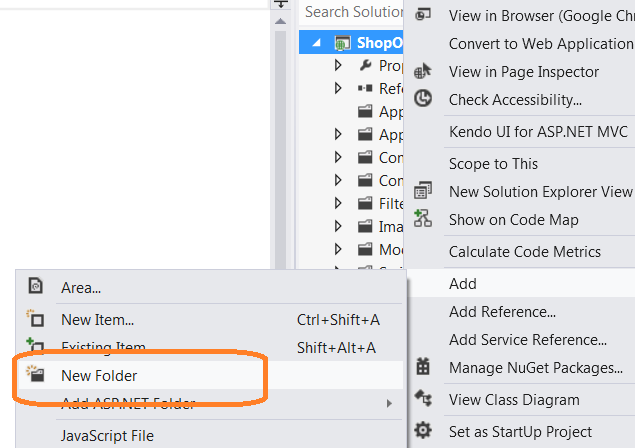
  5. Now we will create a ViewModel as we need to pass both Category and Product model to "Category wise Products" page. To know more about ViewModel, Please visit "ViewModel" section of this article. Now add a “ViewModels” folder in project by right clicking at project > Add > New Folder as shown below:Adding ViewModel Folder
  6. Inside ViewModels, add a class called “ProductCategoryVM” and add the following code in it:
    public class ProductCategoryVM
    {
        public int SelectedCategoryId = -1;
        public List<Category> AllCategories { get; set; }
        public List<Product> AllProducts { get; set; }
    }
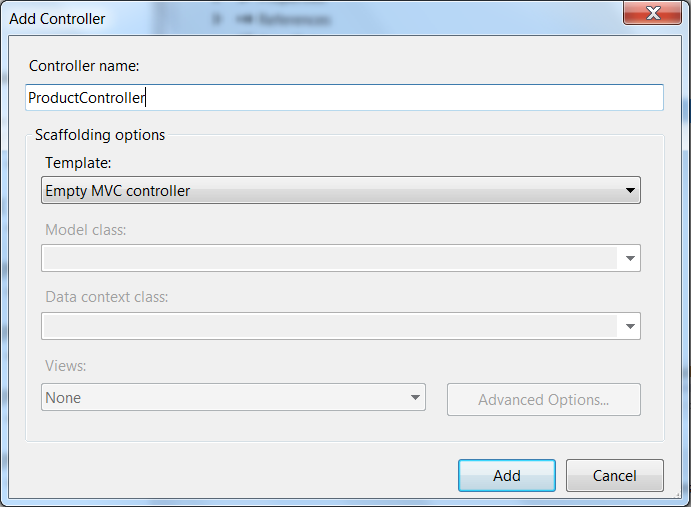
  7. In Controllers folder, add a new empty controller called “ProductController” as shown below:Adding Product Controller
  8. Add the following code in ProductController class and add the appropriate namespaces as needed:
    DataRepository _repository = new DataRepository();
    
    public ActionResult AllProducts()
    {
        List<Product> productModel = new List<Product>();
        productModel = _repository.GetProducts();
        return View(productModel);
    }
    
    public ActionResult CategoryWiseProducts()
    {
        ProductCategoryVM vm = new ProductCategoryVM();
        vm.AllCategories = _repository.GetCategories();
        vm.AllProducts = _repository.GetProducts();
        return View(vm);
    }

Creating Views

We will create two views for each action method in Controller: One specific for desktop and second for Mobile. As of now in mobile specific view, we will just write the text saying that it is mobile specific. We will install jQuery Mobile, design and complete mobile specific view in Part 2 of this article.
Follow the below steps to add Views:
  1. First, build the project (otherwise model class would not appear in listbox while creating Views). Now onProductController, right click on “AllProducts” action method and from menu, select “Add View”. You will get a popup as below fill the details shown here and click OK.Adding Product View
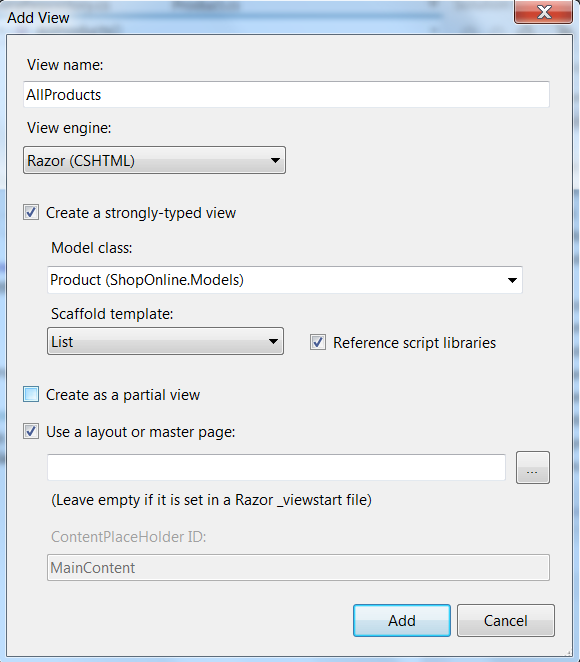
    It will add AllProducts.cshtml in Views > Product folder.
  2. In AllProducts.cshtml, delete header and below Action link for “Create New” as we would not use it:
                         <h2>All Products</h2>
                         <p>@Html.ActionLink("Create New", "Create") </p>
    Add a new the table (in place of deleted “Create New” action link) as shown below:
     <table >
        <tr>
             <td style="width:20%; text-align:left;">
                <h2>All Products</h2>
            </td>
            <td style="width:90%; text-align:right;">
                @Html.ActionLink("Category wise Products", 
                "CategoryWiseProducts", "", 
                new { style = "font-size:20px; background-color:lightblue;" })
            </td>
        </tr>
    </table>                 
    Now, update the existing table to display products detail. First, update the table header code as following:
    <tr>
        <th>Name
        </th>
        <th>Description
        </th>
    </tr>
    And delete the code for below Action links in Product Table as we will not implement anything for those:
    <td>
        @Html.ActionLink("Edit", "Edit", new { id=item.ProductId }) |
        @Html.ActionLink("Details", "Details", new { id=item.ProductId }) |
        @Html.ActionLink("Delete", "Delete", new { id=item.ProductId })
    </td>                 
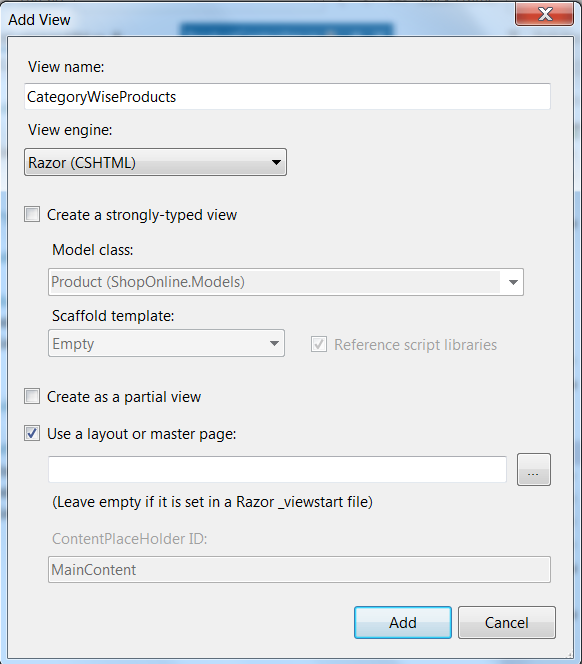
  3. Now again go to ProductController, right click on “CategoryWiseProducts” action method and from menu select “Add View”. This time we will get a popup as below fill the details shown here (we will go for empty View so uncheck the checkbox for "Create a strongly-typed view") and click OK.Adding Category wise Products View
    Write the following code in the new View added CategoryWiseProducts.cshtml.
    @model ShopOnline.ViewModels.ProductCategoryVM
    @{
        ViewBag.Title = "Category wise Products";
        SelectList cat = new SelectList(Model.AllCategories, "CategoryId", "CategoryName");  
    }
    
    <h2>Category wise Products</h2>
    <br />
    <table>
        <tr>
            <td style="font-size: 16px;">Select a Category:
            </td>
            <td>
                @Html.DropDownListFor(m => m.SelectedCategoryId, cat, 
                "Select Category", new { style = "width:200px; font-size:16px;" })
            </td>
        </tr>
    </table>
    
    <table>
        <tbody id="tblProductData">
        </tbody>
    </table>
    
    <script>       
        $("#SelectedCategoryId").change(function () {                    
            var selectedCategory = $(this).val().trim();             
            var allProducts = @Html.Raw(Json.Encode(Model.AllProducts));            
            
            $('#tblProductData').empty();
            var headers = '<tr><th>Name</th><th>Description</th></tr>';           
            var elements = "";
            for (var i = 0; i < allProducts.length; i++) {
                 if(allProducts[i].ProductCategory.CategoryId == selectedCategory)
                    elements = elements + '<tr><td>' + 
                    allProducts[i].ProductName + '</td><td>' + 
                    allProducts[i].ProductDescription + '</td></tr>';
             }             
            if (elements != "")
                $('#tblProductData').append(headers + elements);
        });   
    </script>
  4. In _Layout page under Views > shared folder, change the location of the following line:
    @Scripts.Render("~/bundles/jquery")
    By default, it is at the bottom, put it in head of layout page. Delete unnecessary links and code, finally it should look like:
    <!DOCTYPE html>
        <html lang="en">
            <head>
                <meta charset="utf-8" />
                <title>@ViewBag.Title - My ASP.NET MVC Application</title>       
                <meta name="viewport" content="width=device-width" />
                @Scripts.Render("~/bundles/jquery")
                @Styles.Render("~/Content/css")
                @Scripts.Render("~/bundles/modernizr")
            </head>
            <body>
                <header>
                    <div class="content-wrapper">
                        <div class="float-center">                    
                            <nav>
                                <ul id="menu">
                                    <li>@Html.ActionLink
                                    ("Home", "Index", "Home")</li>
                                    <li>@Html.ActionLink("Products", 
                                    "AllProducts", "Product")</li>                            
                                </ul>
                            </nav>
                        </div>
                    </div>
                </header>
                <div id="body">           
                    <section class="content-wrapper main-content clear-fix">
                        @RenderBody()
                    </section>
                </div>       
            </body>
        </html>
  5. Now in Views > Product folder, copy both AllProducts.cshtml and CategoryWiseProducts.cshtml, and paste by right clicking on Product folder itself. You will get “Copy of AllProducts.cshtml” and “Copy ofCategoryWiseProducts.cshtml”, rename those as “AllProducts.Mobile.cshtml” and “CategoryWiseProducts.Mobile.cshtml” respectively.Change the <h2> tag of both “AllProducts.Mobile.cshtml” to "All Products : Mobile View" and similarly for “CategoryWiseProducts.Mobile.cshtml” to "Category Wise Product : Mobile View".
    It is just to identify that if the request is coming from mobile device, the .Mobile.cshtml View would be rendering. We will design and optimize those views for mobile screen in the next part of this article.
  6. Finally, we need to change the default page of our application, so go to App_Start > RouteConfig.cs and inside RegisterRoute method, change default route as:
    public static void RegisterRoutes(RouteCollection routes)
    {
        routes.IgnoreRoute("{resource}.axd/{*pathInfo}");
        routes.MapRoute(
            name: "Default",
            url: "{controller}/{action}/{id}",
            defaults: new { controller = "Product", 
            action = "AllProducts", id = UrlParameter.Optional }
        );
    }               
Running the Application

The simplest way to test mobile views is using Safari browser because it is inbuilt user agent switcher. Follow this link to know how to activate and use it. For this application, I have used Safari and taken screen shot for that only.
If you are using Chrome, you can use extension User-Agent Switcher for Chrome. There are many resources on how to use it. If you do not want to install anything new, you can even change user agent without any addition tool too as described here. Further, you can use emulator or other techniques also as described here.
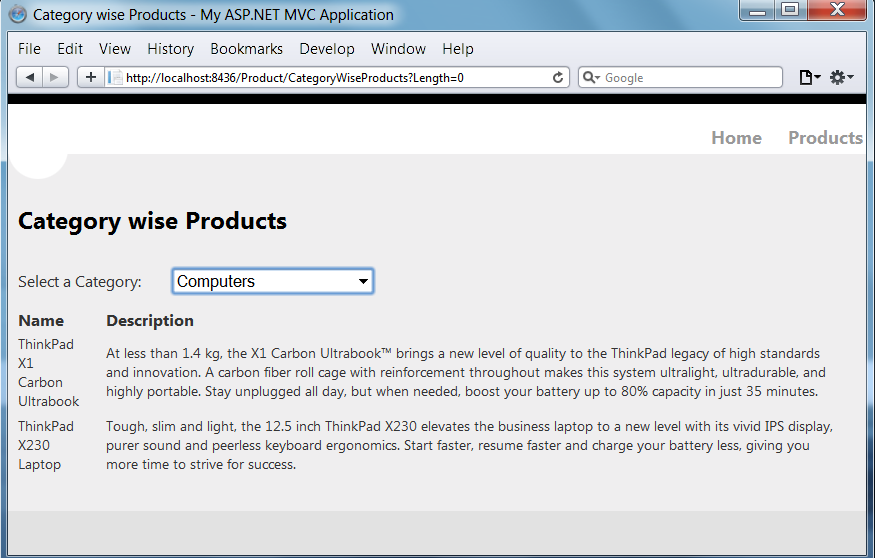
Using Safari browser inbuilt user agent switcher, you can see the output for both kinds of Views for "Category wise Products" we developed so far as shown in the below screenshots:
Desktop View:
Web Page for Desktop
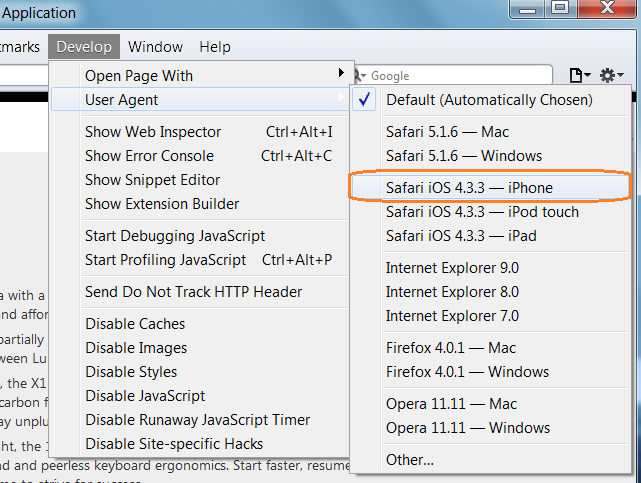
Now change the user agent as following:
Changing User Agent
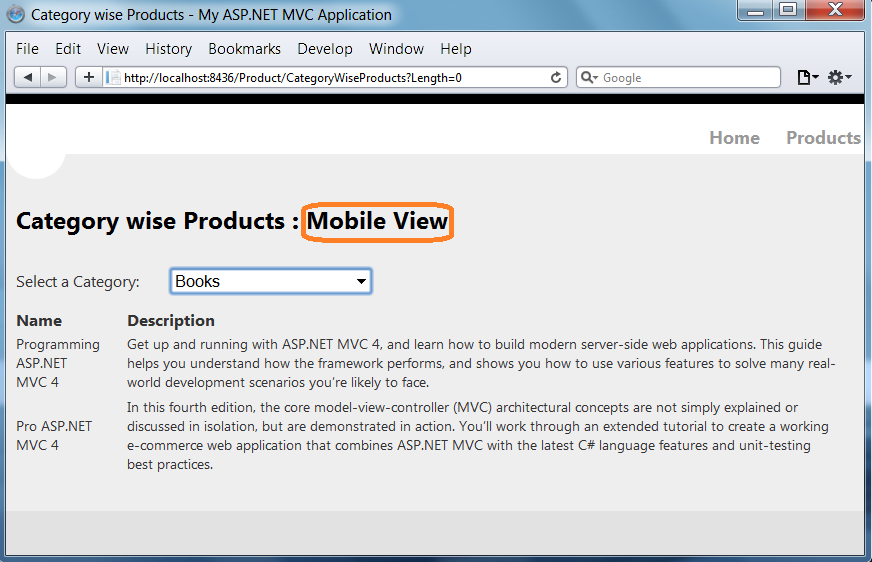
We can see Mobile View:
Web Page for Mobile

Installing jQuery Mobile

To develop the mobile specific view, we will use jQuery Mobile. It is a framework for developing responsive website or web applications for all kinds of smartphones and tablets and desktops devices.
  1. Click on TOOLS tab and go to “Library Package Manager” > “Manage NuGet Packages for Solution” option.NuGet Package Manager UI
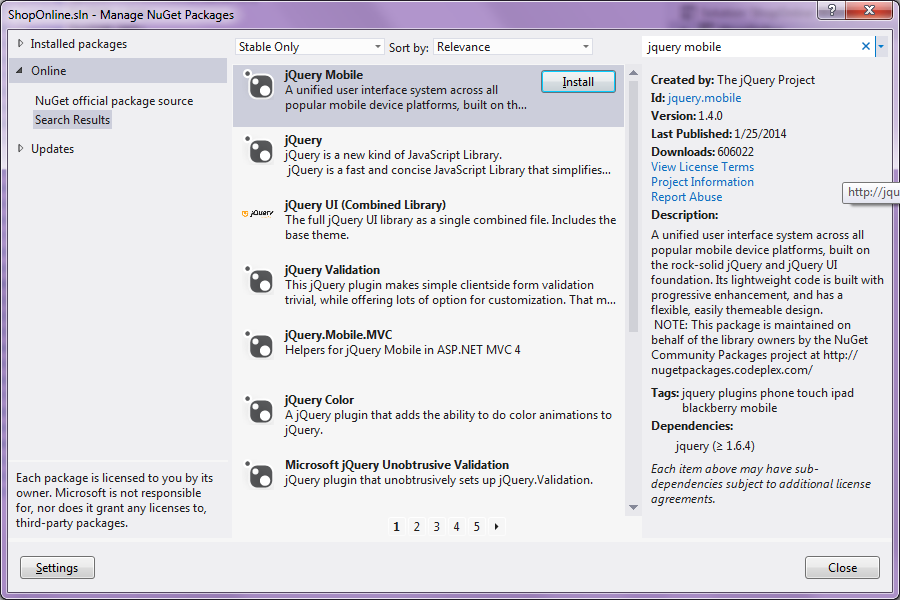
  2. Search for jQuery mobile as we searched for 51Degrees.mobi in the first part of this article and click on Install as shown in the below screenshots button.Searching for JQuery Mobile
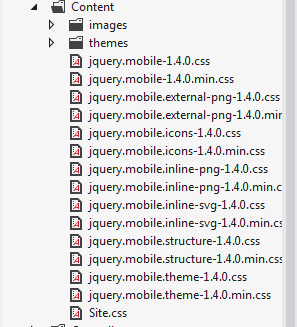
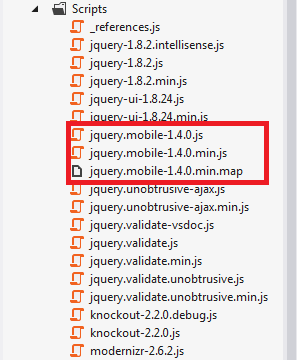
  3. As you will click on Install button, you need to confirm the popup for projects to which you would like to install by clicking OK as we done for 51Degrees.mobi. It will install jQuery Mobile in your project and you will be able to see some new CSS added to Content folder and new Scripts file added to Scripts folder as shown in the below screenshots:Content Folder
    Script Folder:
    Script Folder
    Now jQuery Mobile is installed in our solution.
    The alternate way to install jQuery Mobile is using Nuget Package manager console as described in Part 1 for 51Degrees.mobi, but this time you need to use the following command:
    Install-Package jQuery.Mobile                 
    You would get as shown in below screenshot:
    Using NuGet Console

Creating Bundles for Mobile Views

Go to App_Start folder and open BundleConfig.cs, and in RegisterBundles method, add the following code:
bundles.Add(new ScriptBundle("~/bundles/Mobilejs").Include(
    "~/Scripts/jquery.mobile-1.*",
    "~/Scripts/jquery-1.*"));

bundles.Add(new StyleBundle("~/Content/Mobilecss").Include(
    "~/Content/jquery.mobile.structure-1.4.0.min.css",
    "~/Content/jquery.mobile-1.4.0.css"));        
Here, we are creating two bundles: one having JavaScripts and the second one having all CSS to be used in mobile specific views. We will refer to those bundles in Mobile Specific layout page.

Designing Layout for Mobile Views

  1. Open Views > Shared folder. Copy existing _Layout.cshtml and paste at Shared folder. Now rename “Copy of _Layout.cshtml ” to “_Layout.Mobile.cshtml”. Write the following code to head tag:
    <meta charset="utf-8" />
        <title>@ViewBag.Title – Mobile Application</title>
        <link href="~/favicon.ico" rel="shortcut icon" type="image/x-icon" />
        <meta name="viewport" content="width=device-width" />
        @Styles.Render("~/Content/Mobilecss")
        @Scripts.Render("~/bundles/Mobilejs")
        @Scripts.Render("~/bundles/modernizr")
    Here, we are referring to newly created bundles which we created in the above section.
  2. Inside body tag, delete all existing code and write the following code:
      <div data-role="page" data-theme="a">
        <div data-role="header" data-position="fixed" data-theme="b">
            <h1>@ViewBag.Title</h1>
            <div data-role="navbar" data-theme="a" data-iconpos="top">
                <ul>
                    <li><a href="@Url.Action("Index", "Home")" data-icon="home">Home</a></li>
                    <li><a href="@Url.Action("AllProducts", "Product")" data-icon="check">Product</a></li>                    
                </ul>
            </div>
        </div>
        <div>
            @RenderSection("featured", false)
            @RenderBody()
        </div>
    </div>
    There are many amazing things with the above code. Focus on attributes like: data-role, data-position, data-theme, etc. and their values. They are attributes defined in jQuery mobile to provide shape and behavior to a div for specific use. The names and purposes are much correlated, it makes those self-explanatory. You can learn more about such attributes from jQuery Mobile demos here.
    Just by having this much code, the Header of mobile views would be mobile friendly. You can run the application and check how the header of mobile views look like.

Designing Products Page for Mobile

Delete the existing code in AllProducts.Mobile.cshtml and write the following code:
@model IEnumerable<ShopOnline.Models.Product>
@{
    ViewBag.Title = "All Products";
}

<div class="ui-grid-a">
    <div class="ui-block-a">
        <hgroup class="title">
            <h1>@ViewBag.Title</h1>
        </hgroup>
    </div>
    <div class="ui-block-b">
        <a class="ui-btn ui-btn" style="color:blue" data-role="button" 
        href="@Url.Action("CategoryWiseProducts", "Product")">Category wise Products</a>
    </div>
</div>

@* Making collapsible set of all products using data-role*@
<div data-role="collapsible-set" data-inset="true">
    @foreach (var item in Model)
    {   
        <div data-role="collapsible">
            <h3>@item.ProductName</h3>
            <ul data-role="listview" data-theme="a" data-divider-theme="a" >
                <li style="white-space:normal">
                    <h4>Detail:</h4>
                    <div>@item.ProductDescription</div>
                </li>
            </ul>
        </div>
    }
</div>                 
Here, first we are creating a Grid having title of page and a button to navigate to “CategoryWiseProducts.Mobile.cshtml” page. After that, we are creating a collapsible set of products detail. Here<li style="white-space:normal"> is very critical code to make the text wrapable otherwise the detail text would not wrap as per the width of bowser screen. If you want to explore more about any attributes or look into possibilities (if you want to design in some other way), please visit jQuery Mobile - Demos and look into controls available there.

Designing Category wise Products Page for Mobile

Delete the existing code in CategoryWiseProducts.Mobile.cshtml and write the following code:
@model ShopOnline.ViewModels.ProductCategoryVM
@{
    ViewBag.Title = "Category wise Products";
    SelectList cat = new SelectList(Model.AllCategories, "CategoryId", "CategoryName");  
}

<h2>Category wise Products</h2>
<div class="ui-field-contain">
    <select name="select-custom-1" id="categorySelect" data-native-menu="false">
        <option value="0">Select a Category</option>
        @foreach (var item in Model.AllCategories)
        {
            <option value="@item.CategoryId">@item.CategoryName</option>
        }
    </select>
</div>
<div id="tblProductData"></div>

<script>        
    $("#categorySelect").change(function () {
        var selectedCategory = $(this).val().trim(); 
        var allProducts = @Html.Raw(Json.Encode(Model.AllProducts));
            $('#tblProductData').empty();
            
            var frontheaders = '<div data-role="collapsible-set" data-inset="true">';           
            var backheaders = '</div>';           
            
            var elements = '';
            for (var i = 0; i < allProducts.length; i++) {
                if(allProducts[i].ProductCategory.CategoryId == selectedCategory)
                    elements = elements + '<div data-role="collapsible"> <h3>' + 
                    allProducts[i].ProductName + '</h3> <ul data-role="listview" 
                    data-theme="a" data-divider-theme="a"> <li style="white-space:normal"> 
                    <h4>Detail:</h4> <div>' + 
                    allProducts[i].ProductDescription + '</div> </li> </ul> </div>';                
            }
            
            if (elements != '')
            {   var data = frontheaders + elements + backheaders
                $('#tblProductData').append(data).trigger('create');            
            }
        });   
</script>                 
Here, first we are creating a select box having all categories. On selection of a category, we are adding products data in tblProductData div under selected category using JavaScript.
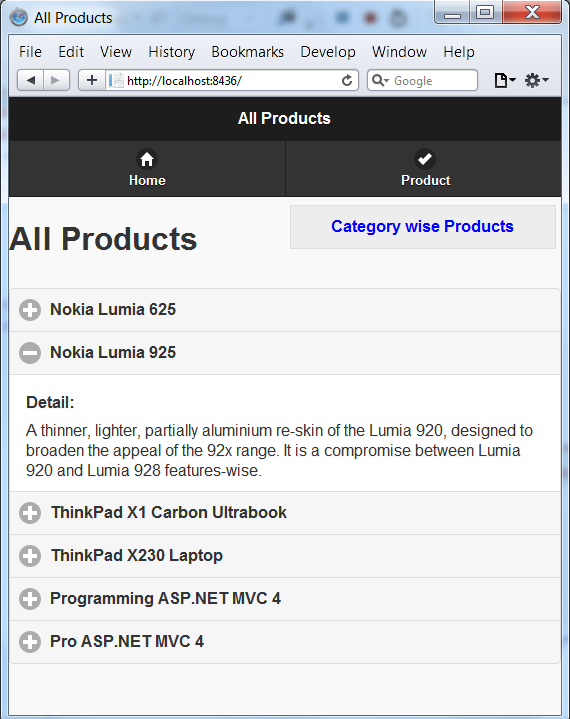
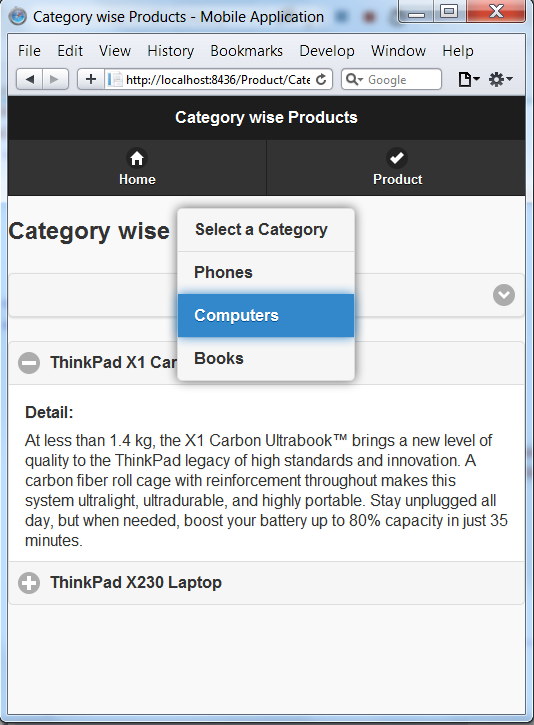
Now we are done with code modification. Run the application and using User Agent Switcher, check for mobile views. You must be able to see the views as shown below:
Mobile Specific "All Products" Page:
All Products Mobile View
Mobile Specific "Category wise Products" Page:
CategoryWiseProducts Mobile View