Step 1 : The first step is to install Node.js and npm. It is recommended that you have node version 4.6.x or greater and npm 3.x.x or greater. To check the versions that you have on your machine type the following commands in a command window.
node -v
npm -v
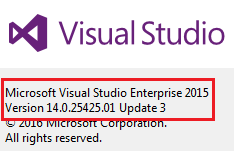
Step 2 : Make sure you have Visual Studio 2015 Update 3 installed. To check the version of Visual Studio you have click on the "Help" menu and then select "About Microsoft Visual Studio". The following are the download links if you don't have Visual Studio 2015 Update 3.
Step 3 : Configure environment settings for node and npm in Visual Studio
Step 4 : Install TypeScript for Visual Studio 2015
https://github.com/angular/quickstart
Step 7 : Copy the required "Starter files" to the web application project
We do not need all the starter files that we downloaded. As you can see from the image below, we need 4 folders/files
Copy the above files/folders and paste them in the root directory of "Angular2Demo" web application project. Now click "Show All File" icon in "Solution Explorer" and include all the copied files/folders in the project. At this stage your project structure in Visual Studio should be as shown below.
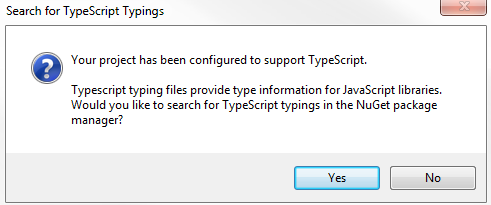
When including the files in the project if you get a prompt to "Search for Typescript Typings" click "No"
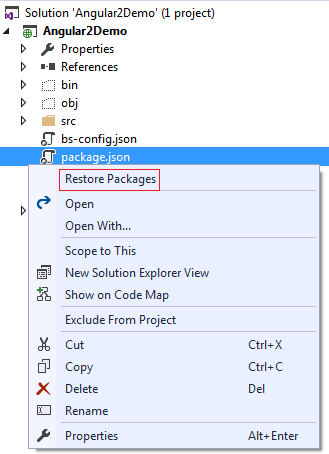
Step 8 : Restore the required packages.
In the "Solution Explorer" right click on "package.json" file and select "Restore Packages" from the context menu. This takes a few minutes to load all the modules. You can see the status in "Visual Studio Output" window. After the restoration is complete, you will see a message "Installing Packages Complete". To see all the installed node modules, click on "Show all Files" icon in Solution Explorer. DO NOT include "node_modules" folder in the project.
Step 9 : Run the project
node -v
npm -v
Step 2 : Make sure you have Visual Studio 2015 Update 3 installed. To check the version of Visual Studio you have click on the "Help" menu and then select "About Microsoft Visual Studio". The following are the download links if you don't have Visual Studio 2015 Update 3.
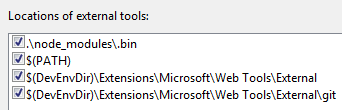
Step 3 : Configure environment settings for node and npm in Visual Studio
- In Visual Studio click on Tools - Options.
- In the "Options" window, expand "Projects and Solutions" and select "External Web Tools"
- In the right pane, move the global $(PATH) entry to be above the internal path $(DevEnvDir) entries. This tells Visual Studio to look for external tools (like npm) in the global path before the internal path.
- Click "OK" to close the "Options" window and then restart Visual Stduio for the changes to take effect
Step 4 : Install TypeScript for Visual Studio 2015
- To develop Angular applications you need TypeScript 2.2.0 or later
- To check the version of TypeScript, clik on the "Help" menu in Visual Studio and select "About Microsoft Visual Studio"

- Download and install the latest version of TypeScript for Visual Studio 2015 from the following URLhttps://www.microsoft.com/en-us/download/details.aspx?id=48593
- After installing TypeScript, the installation wizard prompts you to restart Visual Studio. So, please restart Visual Studio for the changes to take effect.
- Run Visual Studio as Administrator
- Click on File - New Project
- Select "Web" under "Visual C#". From the right pane select "ASP.NET Web Application"
- Name the project "Angular2Demo"
- On the next screen, select "Empty" template and click "OK"
https://github.com/angular/quickstart
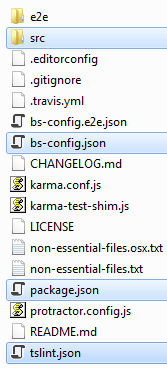
Step 7 : Copy the required "Starter files" to the web application project
We do not need all the starter files that we downloaded. As you can see from the image below, we need 4 folders/files
- src folder and it's contents
- bs-config.json
- package.json
- tslint.json
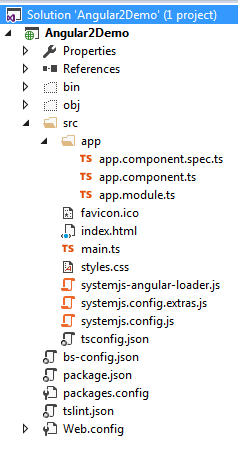
Copy the above files/folders and paste them in the root directory of "Angular2Demo" web application project. Now click "Show All File" icon in "Solution Explorer" and include all the copied files/folders in the project. At this stage your project structure in Visual Studio should be as shown below.
When including the files in the project if you get a prompt to "Search for Typescript Typings" click "No"
Step 8 : Restore the required packages.
In the "Solution Explorer" right click on "package.json" file and select "Restore Packages" from the context menu. This takes a few minutes to load all the modules. You can see the status in "Visual Studio Output" window. After the restoration is complete, you will see a message "Installing Packages Complete". To see all the installed node modules, click on "Show all Files" icon in Solution Explorer. DO NOT include "node_modules" folder in the project.
Step 9 : Run the project
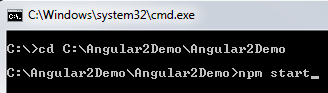
- In the "RUN" window type "cmd" and press enter
- Change the directory in the command prompt to the directory where you have the web application project. I have my web application project in "C:\Angular2Demo\Angular2Demo". So I have typed CD C:\Angular2Demo\Angular2Demo and upon pressing the enter key I am in the root folder.
- Type "npm start" and press "Enter" key
- This launches the TypeScript compiler (tsc) which compile the application and wait for changes. It also starts the lite-server and launches the browser where you will see the output - Hello Angular.
- At this point, open "app.component.ts" file from "Solution Explorer". This file is present in "app" folder in "src" folder.
- Change "name" value from "Angular" to "Angular 2!" and you will see the changes reflected on the web page automatically.
At the moment, if we run the application from Visual Studio, using F5 or CTRL+F5, we get the message "Loading AppComponent content here ..." but nothing happens beyond that. To be able to run the application using F5 or CTRL+F5 we need to make the following changes.
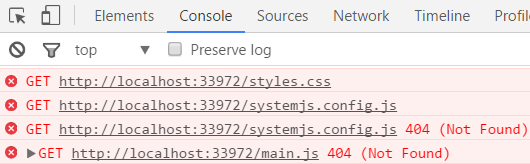
1. Launch browser developers tools by pressing F12. Notice we have "404 Not Found"errors for the following files.
All these files are present in "src" folder. So to fix these "404 Not Found" errors, in index.html file, change <base href="/"> to <base href="/src/">
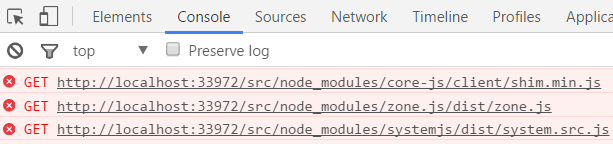
2. Save the changes and reload the page. At this point we get another set of "404 Not Found" errors for the following files.
To fix these errors, in index.html change the above script references as shown below. Notice, we have included "/" just before node_modules
Also in systemjs.config.js file, CHANGE
At this point reload the page and you will see "Hello Angular" message without any errors.
One important point to keep in mind is that, now we will not be able to run the application using "npm start" command.
We still have one more issue. Let us first understand the issue.
1. Expand "app" folder. This folder is inside "src" folder
2. Open "app.component.ts" file
3. Set name="Angular 2!" from name="Angular"
4. Save the changes and reload the web page
5. Notice, we do not see the changes on the web page
6. However, if we run the application by pressing F5 or CTRL+F5 from visual studio we see the changes in the browser.
So what is the issue?
TypeScript is not complied to JavaScript when we save the file and this the reason we do not see the changes in the browser. However, when we run the application by pressing F5 or CTRL+F5 from visual studio TypeScript is compiled to JavaScript and we see the changes.
If you want Visual Studio to compile TypeScript to JavaScript when the changes are saved, we need to turn this feature "ON" by including the following setting in tsconfig.json file. You will find this file in "src" folder. Notice we have set "compileOnSave" to true. With this change tsconfig.json file looks as shown below.
At this point TypeScript is automatically compiled to JavaScript when the file is saved, so the changes are reflected in the browser when the page is reloaded.
At the moment, we are using Visual Studio built-in IIS express server. In a later video in this course we will discuss how to use full blown IIS instead of Visual Studi built-in IIS express.
1. Launch browser developers tools by pressing F12. Notice we have "404 Not Found"errors for the following files.
- styles.css
- systemjs.config.js
- main.js
All these files are present in "src" folder. So to fix these "404 Not Found" errors, in index.html file, change <base href="/"> to <base href="/src/">
2. Save the changes and reload the page. At this point we get another set of "404 Not Found" errors for the following files.
- shim.min.js
- zone.js
- system.src.js
<script src="node_modules/core-js/client/shim.min.js"></script>
<script src="node_modules/zone.js/dist/zone.js"></script>
<script src="node_modules/systemjs/dist/system.src.js"></script>
To fix these errors, in index.html change the above script references as shown below. Notice, we have included "/" just before node_modules
<script src="/node_modules/core-js/client/shim.min.js"></script>
<script src="/node_modules/zone.js/dist/zone.js"></script>
<script src="/node_modules/systemjs/dist/system.src.js"></script>
Also in systemjs.config.js file, CHANGE
At this point reload the page and you will see "Hello Angular" message without any errors.
One important point to keep in mind is that, now we will not be able to run the application using "npm start" command.
We still have one more issue. Let us first understand the issue.
1. Expand "app" folder. This folder is inside "src" folder
2. Open "app.component.ts" file
3. Set name="Angular 2!" from name="Angular"
4. Save the changes and reload the web page
5. Notice, we do not see the changes on the web page
6. However, if we run the application by pressing F5 or CTRL+F5 from visual studio we see the changes in the browser.
So what is the issue?
TypeScript is not complied to JavaScript when we save the file and this the reason we do not see the changes in the browser. However, when we run the application by pressing F5 or CTRL+F5 from visual studio TypeScript is compiled to JavaScript and we see the changes.
If you want Visual Studio to compile TypeScript to JavaScript when the changes are saved, we need to turn this feature "ON" by including the following setting in tsconfig.json file. You will find this file in "src" folder. Notice we have set "compileOnSave" to true. With this change tsconfig.json file looks as shown below.
{
"compileOnSave": true,
"compilerOptions": {
"noStrictGenericChecks": true,
"target": "es5",
"module": "commonjs",
"moduleResolution": "node",
"sourceMap": true,
"emitDecoratorMetadata": true,
"experimentalDecorators": true,
"lib": [ "es2015", "dom" ],
"noImplicitAny": true,
"suppressImplicitAnyIndexErrors": true }
}
At this point TypeScript is automatically compiled to JavaScript when the file is saved, so the changes are reflected in the browser when the page is reloaded.
At the moment, we are using Visual Studio built-in IIS express server. In a later video in this course we will discuss how to use full blown IIS instead of Visual Studi built-in IIS express.
No comments:
Post a Comment