Starting with Internet Template
- Let us create a sample application by selecting ASP.NET MVC4 Web Application template and give it project name as ShopOnline and click "OK".
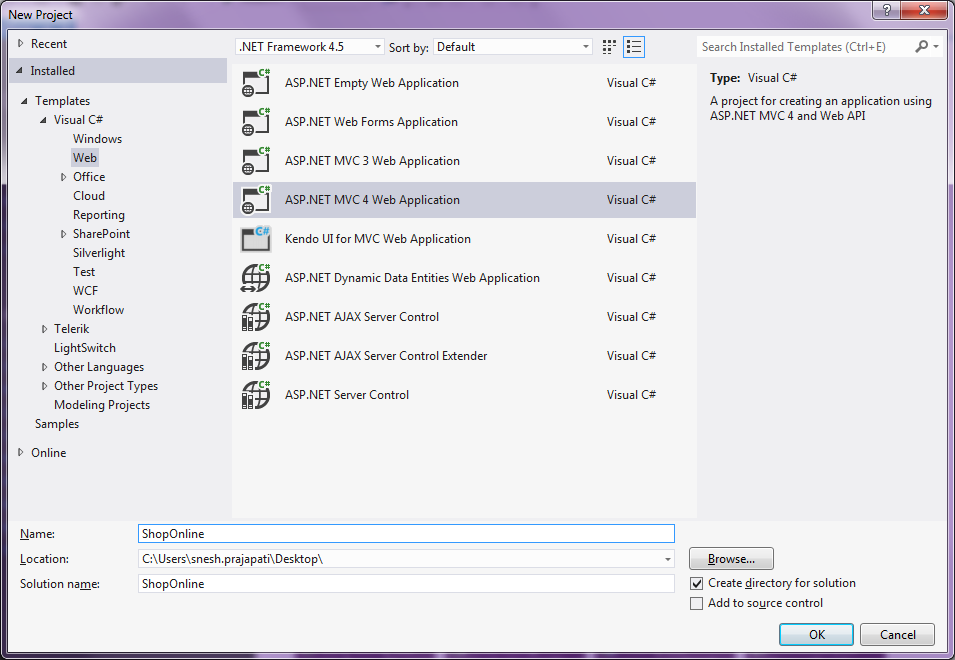
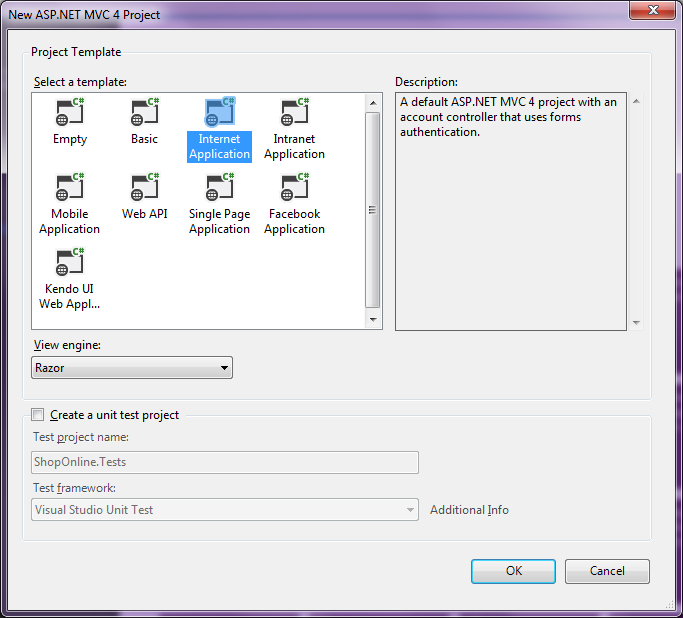
- Select a template as Internet Application. Visual Studio 2012 adds a ShopOnline project in the solution as shown below in the screenshot:
Installing 51Degrees.mobi
The user-agent header of incoming http request identifies the application requesting the information from the server, typically a browser. This string used for identification is called the user-agent string and contains tokens that provide specific details about the program making the request. To know more about user agent, please visit here.
There are two most widely used options to detect the browser:
There are two most widely used options to detect the browser:
- By registering Display Mode in
App_Startas described at this blog. - Using 51Degrees.mobi. Using this library device data, accurate screen sizes, input methods, plus manufacturer and model information are all available to application.
We will use 51Degrees.mobi here. There are two ways to install 51Degrees.mobi by using Nuget Packages Console or using Nuget Packages tool. Here we will install it by using NuGet packages tool. NuGet is an open source package manager tool which is inbuilt for Visual Studio 2010 and 2012. It downloads packages and required dependencies. There are following steps to download the 51Degrees.mobi:
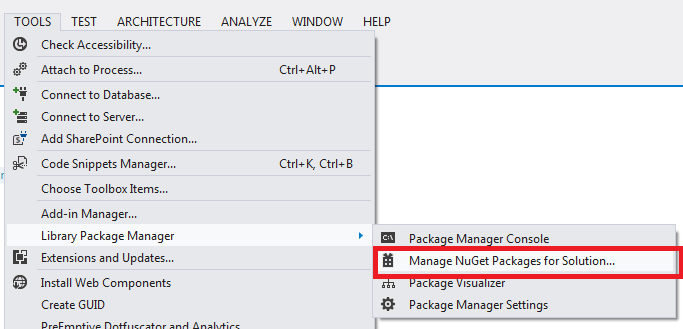
- Click on TOOLS in Menu bar, go to "Library Package Manager" and the choose "Manage NuGet Packages for Solution" option as shown in the below screenshot.
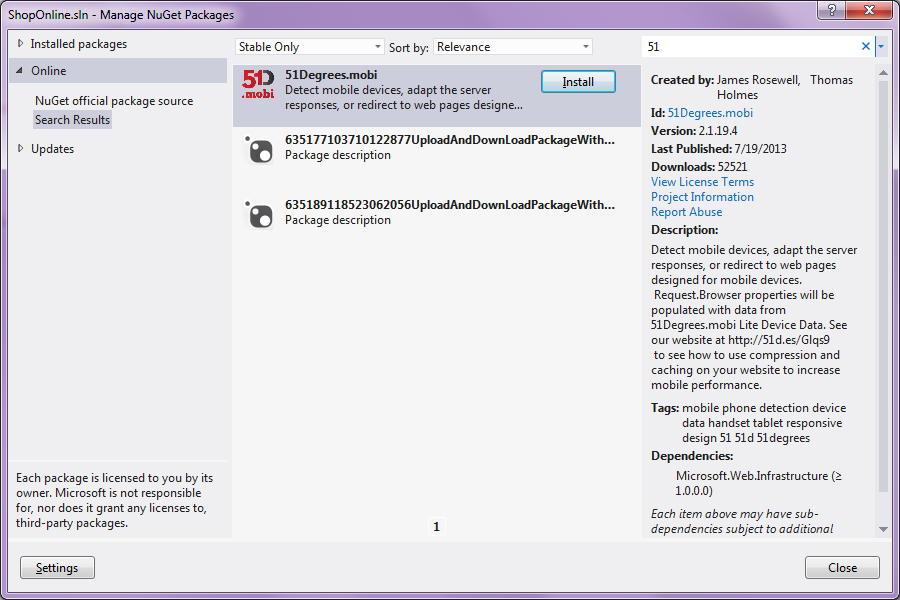
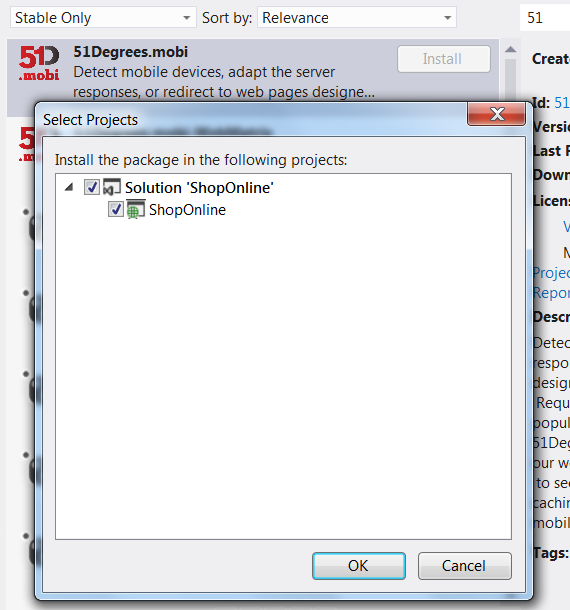
From left hand side menu, select Online > All. Now click in the search text box at right hand side (top), and write “51”, in search the 51.Degrees.mobi would appear as shown below. Click on Install button appeared beside 51.Degrees.mobi.
It will give you a pop up for confirmation with project name as shown below, just click ok.
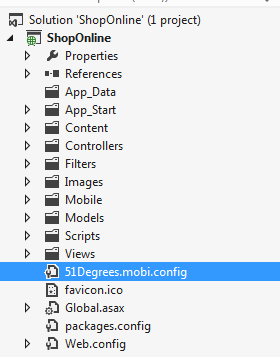
- Hope you will be able to see “51Degrees.mobi.config” file in your project as shown below:
- By default, it will create a “mobile” folder in application. We should delete that unnecessary folder and we will be having our mobile view in Views folder only.
- Open 51Degrees.mobi.config file and comment the following lines of code (as it is redirects the request from Mobiles to “~/mobile/default.aspx” which we do not want here).
<redirect
    firstRequestOnly="false"
    mobileHomePageUrl="~/mobile/default.aspx"
    timeout="20"
    devicesFile="~/App_Data/Devices.dat"
    mobilePagesRegex="mobile">
</redirect>
Using Nuget Package Manager Console
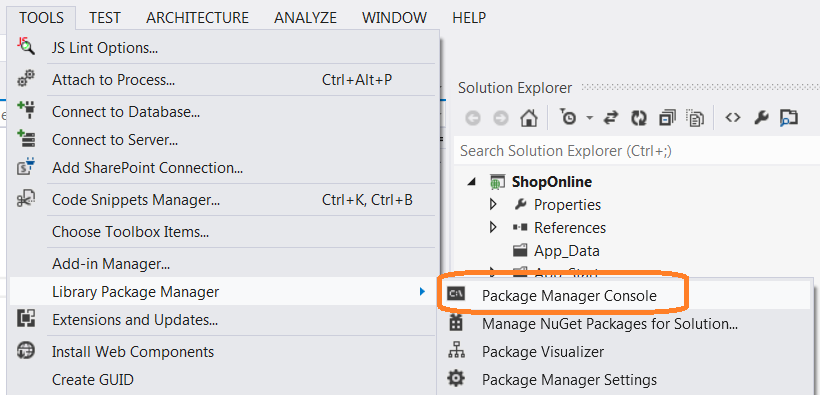
An alternate way to install 51Degrees.mobi is using “Nuget Package Manager Console”. You need to go to Top menu “TOOLS > Library Package Manager > Package Manager Console” as shown below:
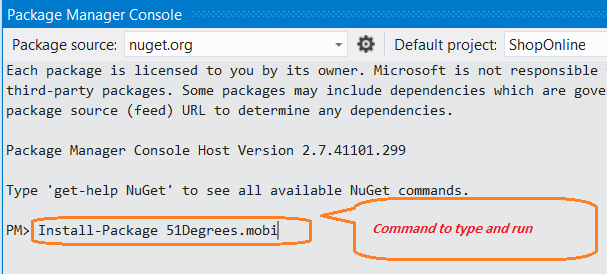
It will open a console window. Now you need to run the flowing command: Install-Package 51Degrees.mobi as shown below”:
It will do the same thing that you achieved from step 1 above. All things as shown in Step 2 would be added and then you need to follow steps 3 and 4 to remove unnecessary folder and setting. If you want to learn more about how 51Degrees.mobi works, please have a visit here and look into section "How does it work?"
Creating Models, ViewModel and Controller
- Inside Models folder, add three class files called
Category,ProductandDataRepository. - In Category.cs, add the following code:
public class Category
{
    public int CategoryId { get; set; }
    public string CategoryName { get; set; }
}
- In Product.cs, add the following code:
public class Product
{
    public int ProductId { get; set; }
    public string ProductName { get; set; }
    public string ProductDescription { get; set; }
    public Category ProductCategory { get; set; }
}
- In DataRepository.cs, add the following code:
public class DataRepository
    {
        public List<Product> GetProducts()
        {
            List<Product> products = new List<Product>{
                    new Product () { ProductId = 1, ProductName = "Nokia Lumia 625",
                        ProductDescription = "A mid-range Lumia with a focus of
                        combining 4G with a large display (4.7 inch, the first time
                        on a Lumia), yet keeping the price in a low and affordable range",
                    ProductCategory =  new Category () { CategoryId = 1, CategoryName = "Phones"}},

                    new Product () { ProductId = 2, ProductName = "Nokia Lumia 925",
                        ProductDescription = "A thinner, lighter, partially aluminium
                        re-skin of the Lumia 920, designed to broaden the appeal of the 92x range.
                        It is a compromise between Lumia 920 and Lumia 928 features-wise.",
                    ProductCategory =  new Category () { CategoryId = 1, CategoryName = "Phones"}},

                    new Product () {ProductId = 3, ProductName = "ThinkPad X1 Carbon Ultrabook",
                        ProductDescription = "At less than 1.4 kg, the X1 Carbon Ultrabook™
                        brings a new level of quality to the ThinkPad legacy of high standards
                        and innovation. A carbon fiber roll cage with reinforcement
                        throughout makes this system ultralight, ultradurable,
                        and highly portable. Stay unplugged all day, but when needed,
                        boost your battery up to 80% capacity in just 35 minutes.",
                    ProductCategory = new Category () {CategoryId = 2, CategoryName = "Computers"}},

                    new Product () {ProductId = 4, ProductName = "ThinkPad X230 Laptop",
                        ProductDescription = "Tough, slim and light,
                        the 12.5 inch ThinkPad X230 elevates the business laptop to a new level
                        with its vivid IPS display, purer sound and peerless keyboard ergonomics.
                        Start faster, resume faster and charge your battery less,
                        giving you more time to strive for success.",
                    ProductCategory = new Category () {CategoryId = 2, CategoryName = "Computers"}},

                    new Product () {ProductId = 5, ProductName = "Programming ASP.NET MVC 4",
                        ProductDescription = "Get up and running with ASP.NET MVC 4,
                        and learn how to build modern server-side web applications.
                        This guide helps you understand how the framework performs,
                        and shows you how to use various features to solve many real-world
                        development scenarios you’re likely to face.",
                    ProductCategory = new Category () {CategoryId = 3, CategoryName = "Books"}},

                    new Product () {ProductId = 6, ProductName = "Pro ASP.NET MVC 4",
                        ProductDescription = "In this fourth edition,
                        the core model-view-controller (MVC) architectural concepts are not
                        simply explained or discussed in isolation, but are demonstrated in action.
                        You’ll work through an extended tutorial to create a working e-commerce
                        web application that combines ASP.NET MVC with the latest
                        C# language features and unit-testing best practices.",
                    ProductCategory = new Category () {CategoryId = 3, CategoryName = "Book"}}
           };

            return products;
        }

        public List<Category> GetCategories()
        {
            return new List<Category> {
            new Category () { CategoryId = 1, CategoryName = "Phones"},
            new Category () {CategoryId = 2, CategoryName = "Computers"},
            new Category () { CategoryId = 3, CategoryName = "Books"}
            };
        }
    }
For the sake of simplicity, we are using hardcoded data in Repository for demo purposes. In real time application, Repository is supposed to do CRUD operations by communication persistent data source like SQL Server, XML or whatever. For this demo, now our model and repository are ready for use. - Now we will create a ViewModel as we need to pass both
CategoryandProductmodel to "Category wise Products" page. To know more aboutViewModel, Please visit "ViewModel" section of this article. Now add a “ViewModels” folder in project by right clicking at project > Add > New Folder as shown below: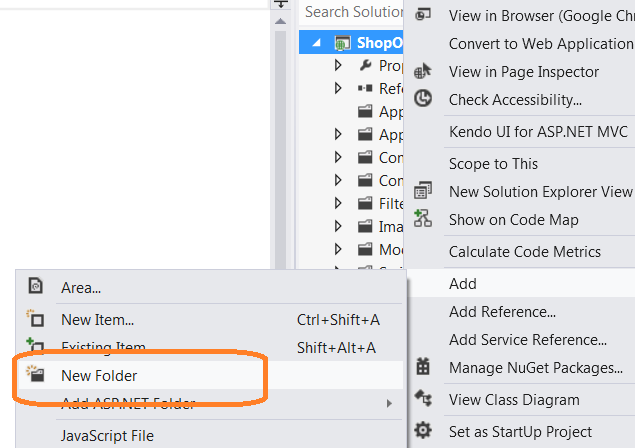
- Inside ViewModels, add a class called “
ProductCategoryVM” and add the following code in it:public class ProductCategoryVM { public int SelectedCategoryId = -1; public List<Category> AllCategories { get; set; } public List<Product> AllProducts { get; set; } }
- In Controllers folder, add a new empty controller called “
ProductController” as shown below: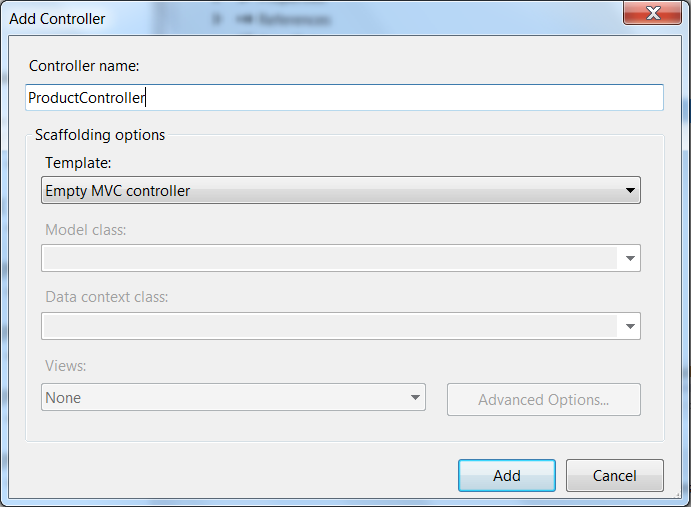
- Add the following code in
ProductControllerclass and add the appropriate namespaces as needed:DataRepository _repository = new DataRepository(); public ActionResult AllProducts() { List<Product> productModel = new List<Product>(); productModel = _repository.GetProducts(); return View(productModel); } public ActionResult CategoryWiseProducts() { ProductCategoryVM vm = new ProductCategoryVM(); vm.AllCategories = _repository.GetCategories(); vm.AllProducts = _repository.GetProducts(); return View(vm); }
Creating Views
We will create two views for each action method in Controller: One specific for desktop and second for Mobile. As of now in mobile specific view, we will just write the text saying that it is mobile specific. We will install jQuery Mobile, design and complete mobile specific view in Part 2 of this article.
Follow the below steps to add Views:
- First, build the project (otherwise model class would not appear in listbox while creating Views). Now on
ProductController, right click on “AllProducts” action method and from menu, select “Add View”. You will get a popup as below fill the details shown here and click OK.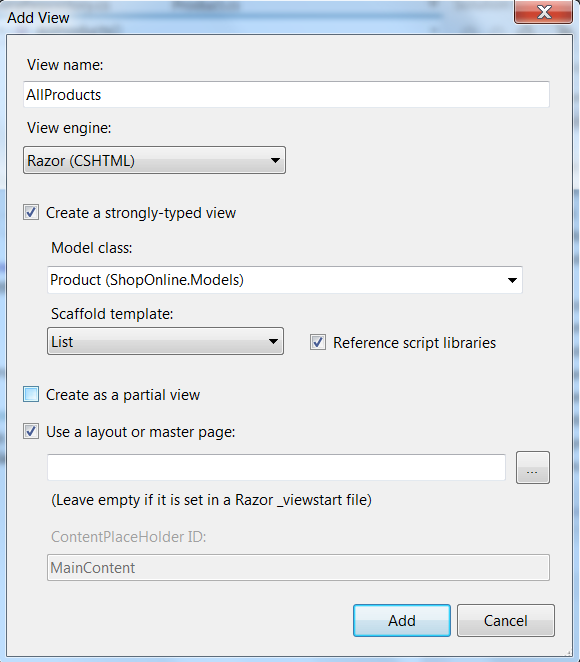
It will add AllProducts.cshtml in Views > Product folder. - In AllProducts.cshtml, delete header and below Action link for “Create New” as we would not use it:
                     <h2>All Products</h2>
                     <p>@Html.ActionLink("Create New", "Create") </p>
Add a new the table (in place of deleted “Create New” action link) as shown below:
 <table >
    <tr>
         <td style="width:20%; text-align:left;">
            <h2>All Products</h2>
        </td>
        <td style="width:90%; text-align:right;">
            @Html.ActionLink("Category wise Products",
            "CategoryWiseProducts", "",
            new { style = "font-size:20px; background-color:lightblue;" })
        </td>
    </tr>
</table>
Now, update the existing table to display products detail. First, update the table header code as following:
<tr>
    <th>Name
    </th>
    <th>Description
    </th>
</tr>
And delete the code for below Action links inProductTable as we will not implement anything for those:
<td>
    @Html.ActionLink("Edit", "Edit", new { id=item.ProductId }) |
    @Html.ActionLink("Details", "Details", new { id=item.ProductId }) |
    @Html.ActionLink("Delete", "Delete", new { id=item.ProductId })
</td>
- Now again go to
ProductController, right click on “CategoryWiseProducts” action method and from menu select “Add View”. This time we will get a popup as below fill the details shown here (we will go for empty View so uncheck the checkbox for "Create a strongly-typed view") and click OK.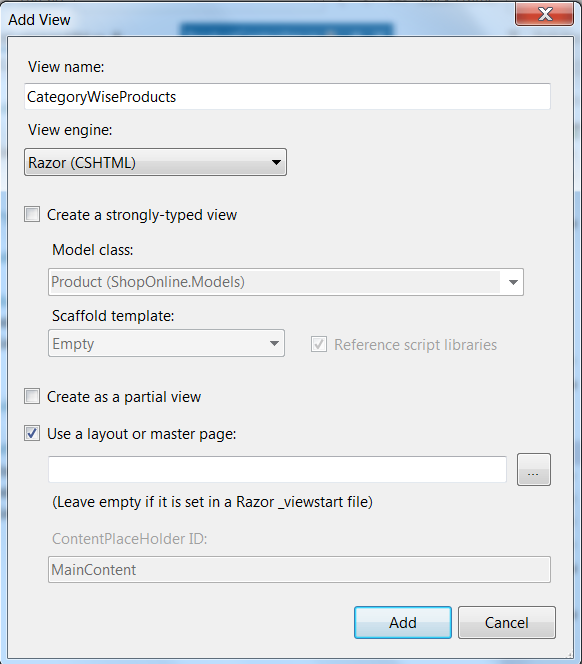
Write the following code in the new View added CategoryWiseProducts.cshtml.
@model ShopOnline.ViewModels.ProductCategoryVM @{ ViewBag.Title = "Category wise Products"; SelectList cat = new SelectList(Model.AllCategories, "CategoryId", "CategoryName"); } <h2>Category wise Products</h2> <br /> <table> <tr> <td style="font-size: 16px;">Select a Category: </td> <td> @Html.DropDownListFor(m => m.SelectedCategoryId, cat, "Select Category", new { style = "width:200px; font-size:16px;" }) </td> </tr> </table> <table> <tbody id="tblProductData"> </tbody> </table> <script> $("#SelectedCategoryId").change(function () { var selectedCategory = $(this).val().trim(); var allProducts = @Html.Raw(Json.Encode(Model.AllProducts)); $('#tblProductData').empty(); var headers = '<tr><th>Name</th><th>Description</th></tr>'; var elements = ""; for (var i = 0; i < allProducts.length; i++) { if(allProducts[i].ProductCategory.CategoryId == selectedCategory) elements = elements + '<tr><td>' + allProducts[i].ProductName + '</td><td>' + allProducts[i].ProductDescription + '</td></tr>'; } if (elements != "") $('#tblProductData').append(headers + elements); }); </script> - In
_Layoutpage under Views > shared folder, change the location of the following line:@Scripts.Render("~/bundles/jquery")By default, it is at the bottom, put it inheadof layout page. Delete unnecessary links and code, finally it should look like:
<!DOCTYPE html>
    <html lang="en">
        <head>
            <meta charset="utf-8" />
            <title>@ViewBag.Title - My ASP.NET MVC Application</title>
            <meta name="viewport" content="width=device-width" />
            @Scripts.Render("~/bundles/jquery")
            @Styles.Render("~/Content/css")
            @Scripts.Render("~/bundles/modernizr")
        </head>
        <body>
            <header>
                <div class="content-wrapper">
                    <div class="float-center">
                        <nav>
                            <ul id="menu">
                                <li>@Html.ActionLink
                                ("Home", "Index", "Home")</li>
                                <li>@Html.ActionLink("Products",
                                "AllProducts", "Product")</li>
                            </ul>
                        </nav>
                    </div>
                </div>
            </header>
            <div id="body">
                <section class="content-wrapper main-content clear-fix">
                    @RenderBody()
                </section>
            </div>
        </body>
    </html>
- Now in Views > Product folder, copy both AllProducts.cshtml and CategoryWiseProducts.cshtml, and paste by right clicking on Product folder itself. You will get “Copy of AllProducts.cshtml” and “Copy ofCategoryWiseProducts.cshtml”, rename those as “AllProducts.Mobile.cshtml” and “CategoryWiseProducts.Mobile.cshtml” respectively.Change the
<h2>tag of both “AllProducts.Mobile.cshtml” to "All Products : Mobile View" and similarly for “CategoryWiseProducts.Mobile.cshtml” to "Category Wise Product : Mobile View".
It is just to identify that if the request is coming from mobile device, the .Mobile.cshtml View would be rendering. We will design and optimize those views for mobile screen in the next part of this article. - Finally, we need to change the default page of our application, so go to App_Start > RouteConfig.cs and inside
RegisterRoutemethod, change default route as:public static void RegisterRoutes(RouteCollection routes) { routes.IgnoreRoute("{resource}.axd/{*pathInfo}"); routes.MapRoute( name: "Default", url: "{controller}/{action}/{id}", defaults: new { controller = "Product", action = "AllProducts", id = UrlParameter.Optional } ); }
Running the Application
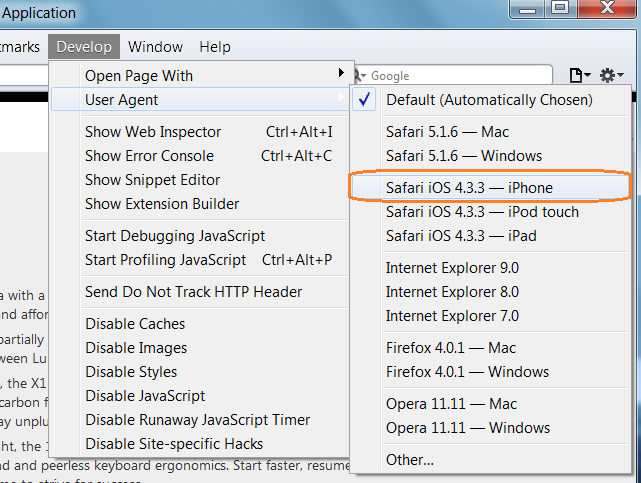
The simplest way to test mobile views is using Safari browser because it is inbuilt user agent switcher. Follow this link to know how to activate and use it. For this application, I have used Safari and taken screen shot for that only.
If you are using Chrome, you can use extension User-Agent Switcher for Chrome. There are many resources on how to use it. If you do not want to install anything new, you can even change user agent without any addition tool too as described here. Further, you can use emulator or other techniques also as described here.
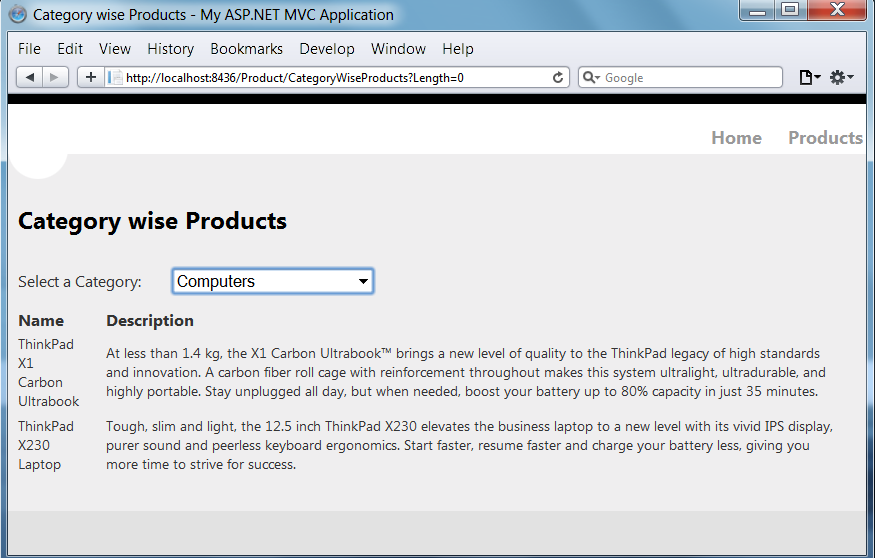
Using Safari browser inbuilt user agent switcher, you can see the output for both kinds of Views for "Category wise Products" we developed so far as shown in the below screenshots:
Desktop View:
Now change the user agent as following:
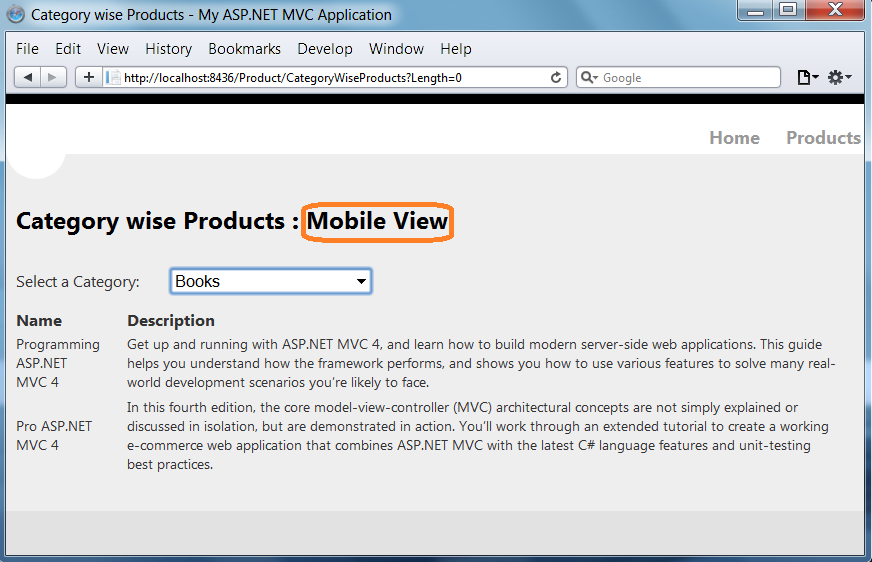
We can see Mobile View:
Installing jQuery Mobile
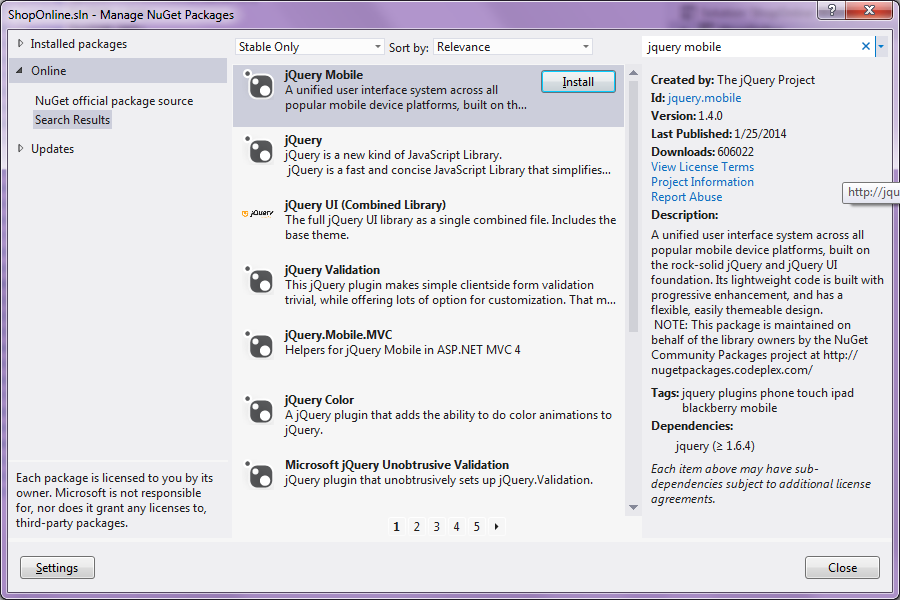
To develop the mobile specific view, we will use jQuery Mobile. It is a framework for developing responsive website or web applications for all kinds of smartphones and tablets and desktops devices.- Click on TOOLS tab and go to “Library Package Manager” > “Manage NuGet Packages for Solution” option.

- Search for jQuery mobile as we searched for 51Degrees.mobi in the first part of this article and click on Install as shown in the below screenshots button.
- As you will click on Install button, you need to confirm the popup for projects to which you would like to install by clicking OK as we done for 51Degrees.mobi. It will install jQuery Mobile in your project and you will be able to see some new CSS added to Content folder and new Scripts file added to Scripts folder as shown in the below screenshots:
Script Folder:
Now jQuery Mobile is installed in our solution.
The alternate way to install jQuery Mobile is using Nuget Package manager console as described in Part 1 for 51Degrees.mobi, but this time you need to use the following command:
Install-Package jQuery.Mobile
You would get as shown in below screenshot:

Creating Bundles for Mobile Views
Go to App_Start folder and open BundleConfig.cs, and inRegisterBundles method, add the following code:bundles.Add(new ScriptBundle("~/bundles/Mobilejs").Include( "~/Scripts/jquery.mobile-1.*", "~/Scripts/jquery-1.*")); bundles.Add(new StyleBundle("~/Content/Mobilecss").Include( "~/Content/jquery.mobile.structure-1.4.0.min.css", "~/Content/jquery.mobile-1.4.0.css"));Here, we are creating two bundles: one having JavaScripts and the second one having all CSS to be used in mobile specific views. We will refer to those bundles in Mobile Specific layout page.
Designing Layout for Mobile Views
- Open Views > Shared folder. Copy existing _Layout.cshtml and paste at Shared folder. Now rename “Copy of _Layout.cshtml ” to “_Layout.Mobile.cshtml”. Write the following code to
headtag:<meta charset="utf-8" /> <title>@ViewBag.Title – Mobile Application</title> <link href="~/favicon.ico" rel="shortcut icon" type="image/x-icon" /> <meta name="viewport" content="width=device-width" /> @Styles.Render("~/Content/Mobilecss") @Scripts.Render("~/bundles/Mobilejs") @Scripts.Render("~/bundles/modernizr")
Here, we are referring to newly created bundles which we created in the above section. - Inside
bodytag, delete all existing code and write the following code:<div data-role="page" data-theme="a"> <div data-role="header" data-position="fixed" data-theme="b"> <h1>@ViewBag.Title</h1> <div data-role="navbar" data-theme="a" data-iconpos="top"> <ul> <li><a href="@Url.Action("Index", "Home")" data-icon="home">Home</a></li> <li><a href="@Url.Action("AllProducts", "Product")" data-icon="check">Product</a></li> </ul> </div> </div> <div> @RenderSection("featured", false) @RenderBody() </div> </div>
There are many amazing things with the above code. Focus on attributes like: data-role, data-position, data-theme, etc. and their values. They are attributes defined in jQuery mobile to provide shape and behavior to adivfor specific use. The names and purposes are much correlated, it makes those self-explanatory. You can learn more about such attributes from jQuery Mobile demos here.
Just by having this much code, the Header of mobile views would be mobile friendly. You can run the application and check how the header of mobile views look like.
Designing Products Page for Mobile
Delete the existing code in AllProducts.Mobile.cshtml and write the following code:@model IEnumerable<ShopOnline.Models.Product>
@{
ViewBag.Title = "All Products";
}
<div class="ui-grid-a">
<div class="ui-block-a">
<hgroup class="title">
<h1>@ViewBag.Title</h1>
</hgroup>
</div>
<div class="ui-block-b">
<a class="ui-btn ui-btn" style="color:blue" data-role="button"
href="@Url.Action("CategoryWiseProducts", "Product")">Category wise Products</a>
</div>
</div>
@* Making collapsible set of all products using data-role*@
<div data-role="collapsible-set" data-inset="true">
@foreach (var item in Model)
{
<div data-role="collapsible">
<h3>@item.ProductName</h3>
<ul data-role="listview" data-theme="a" data-divider-theme="a" >
<li style="white-space:normal">
<h4>Detail:</h4>
<div>@item.ProductDescription</div>
</li>
</ul>
</div>
}
</div>
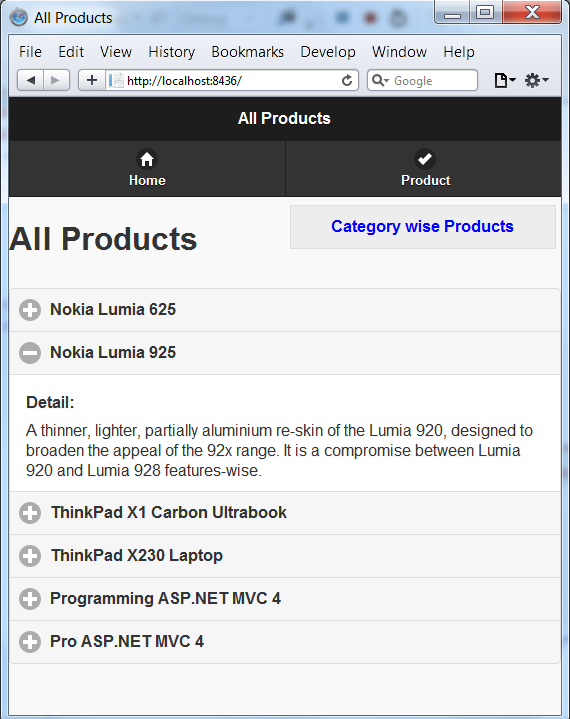
Here, first we are creating a Grid having title of page and a button to navigate to “CategoryWiseProducts.Mobile.cshtml” page. After that, we are creating a collapsible set of products detail. Here<li style="white-space:normal"> is very critical code to make the text wrapable otherwise the detail text would not wrap as per the width of bowser screen. If you want to explore more about any attributes or look into possibilities (if you want to design in some other way), please visit jQuery Mobile - Demos and look into controls available there.Designing Category wise Products Page for Mobile
Delete the existing code in CategoryWiseProducts.Mobile.cshtml and write the following code:@model ShopOnline.ViewModels.ProductCategoryVM
@{
ViewBag.Title = "Category wise Products";
SelectList cat = new SelectList(Model.AllCategories, "CategoryId", "CategoryName");
}
<h2>Category wise Products</h2>
<div class="ui-field-contain">
<select name="select-custom-1" id="categorySelect" data-native-menu="false">
<option value="0">Select a Category</option>
@foreach (var item in Model.AllCategories)
{
<option value="@item.CategoryId">@item.CategoryName</option>
}
</select>
</div>
<div id="tblProductData"></div>
<script>
$("#categorySelect").change(function () {
var selectedCategory = $(this).val().trim();
var allProducts = @Html.Raw(Json.Encode(Model.AllProducts));
$('#tblProductData').empty();
var frontheaders = '<div data-role="collapsible-set" data-inset="true">';
var backheaders = '</div>';
var elements = '';
for (var i = 0; i < allProducts.length; i++) {
if(allProducts[i].ProductCategory.CategoryId == selectedCategory)
elements = elements + '<div data-role="collapsible"> <h3>' +
allProducts[i].ProductName + '</h3> <ul data-role="listview"
data-theme="a" data-divider-theme="a"> <li style="white-space:normal">
<h4>Detail:</h4> <div>' +
allProducts[i].ProductDescription + '</div> </li> </ul> </div>';
}
if (elements != '')
{ var data = frontheaders + elements + backheaders
$('#tblProductData').append(data).trigger('create');
}
});
</script>
Here, first we are creating a select box having all categories. On selection of a category, we are adding products data in tblProductData div under selected category using JavaScript.Now we are done with code modification. Run the application and using User Agent Switcher, check for mobile views. You must be able to see the views as shown below:
Mobile Specific "All Products" Page:
Mobile Specific "Category wise Products" Page:

No comments:
Post a Comment